
We are influencers and brand affiliates. This post contains affiliate links, most which go to Amazon and are Geo-Affiliate links to nearest Amazon store.
Being a gamer is expensive, I know I have probably paid for a house with all the money I have put into PC’s since I was 13…. a ton of money. Even though I have put so much in and looking back, it hurts to see how much I have but I know it will just be a love affair that will continue. When I started, I didn’t have much money and back in those days,… it didn’t matter because nothing was affordable on an IBM 5150, but it’s a bit different today. Gamers today have a choice of going to an integrated solution on the CPU all the way up to a down payment on a car with the top of the line GPU. Just above the integrated solution we have the Sapphire Radeon NITRO RX460OC 4GB 11257-02-20G, a budget card…. Wait wait, don’t go, you might be surprised.
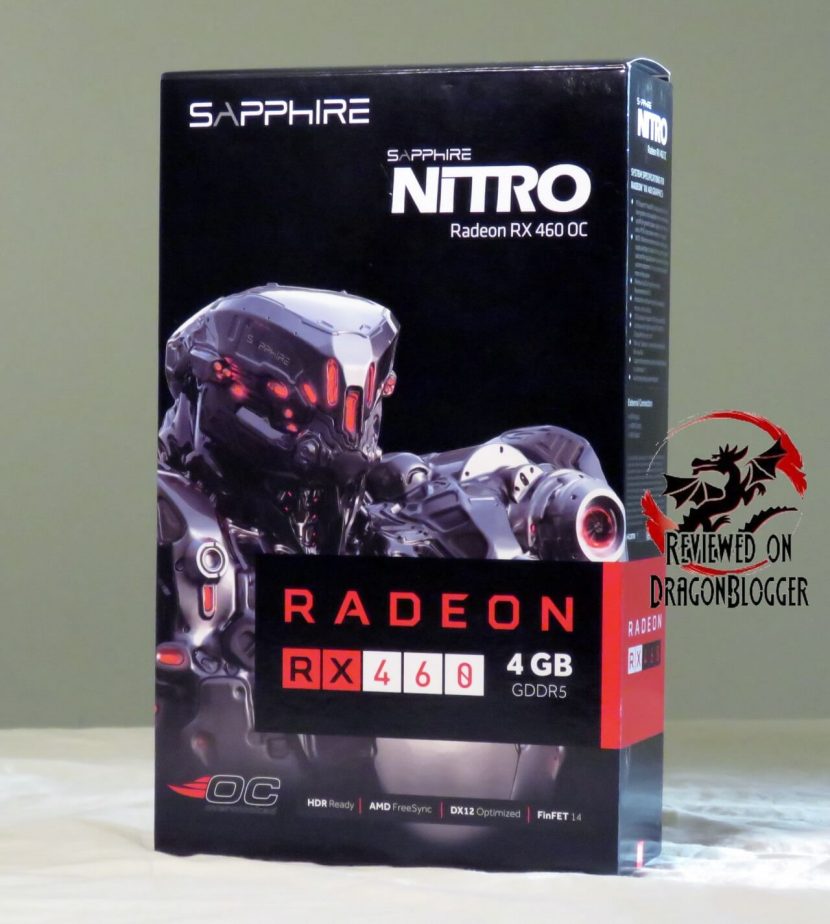
I will slowly work you into this review, but please be patient. Let me start you off with the Spec’s.
Spec’s and Features
- Engine Clock: 1175Mhz
- Boost Engine Clock: 1250 (Seems to always run at this speed though)
- 4096MB GDDR5 128-bit RAM
- 1750Mhz
- 7000Mhz Effective Memory Frequency
- Compute Shaders: 2304
- Supports Crossfire
- 3 Output Maximum
- 1 x DVI-D
- 1 x HDMI 2.0b
- 1 x Display Port 1.4
- Resolutions Supported
- DVD-D
- 2560 x 1600 (60Hz)
- HDMI 2.0b
- 3840 x 2160p (60Hz)
- Display Port
- 3840 x 2160 (60Hz)
- Supported API’s:
- OpenGL 4.5
- OpenCL 2.0
- DirectX 12
- Shader Model 5.0
- Vulkan API
- Supported Features
- CrossFire
- FreeSync Technology
- AMD Eyefinity
- Dual Bios
- AMD Liquid VR Technology
- AMD Virtual Super Resolution (VSR)
- AMD TrueAudio Next Technology
- AMD Xconnect Ready
- DirecX 12 Optimized
- Radeon VR ready Premium
- HDR Ready
- Frame Rate Target Control
- NITRO Fan Check
- Dual X-Fans
- Two Ball Bearing
- NITRO Quick Connect System
- Dual-X Cooling
- NITRO Boost
- Black Diamond Choke 4
- Power Consumption: 150Watts
- System Requirements
- 400Watt Power Supply
- 1 x 6 Pin AUX Power Connector (Yes, only 1)
- Windows 10, 8.1, 8 or 7
- Form Factor
- DVD-D
- Length: 8.70in
- Width: 4.84in
- Depth: 1.49in
- 1750Mhz
Lots of stuff there, I know, but let’s get into an unboxing
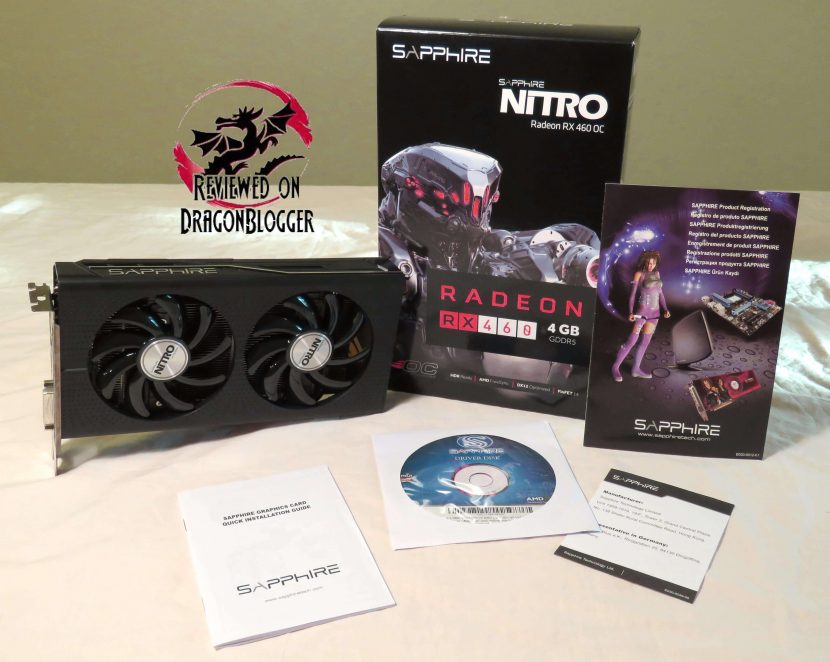
You can connect up to 3 monitors to this little guy,… it is a budget GPU.
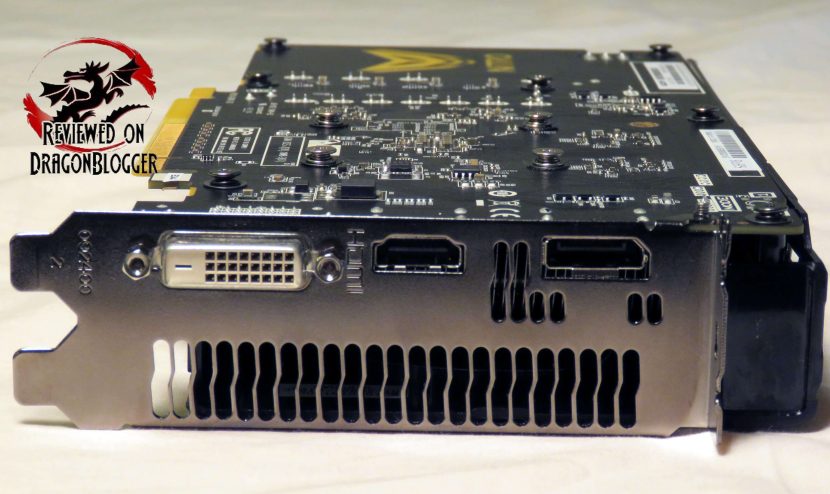
You can attach an HDMI capable monitor, Display Port capable monitor or even a DVI-D capable monitor. Chances are, no matter what monitor you have you can connect to this video card.
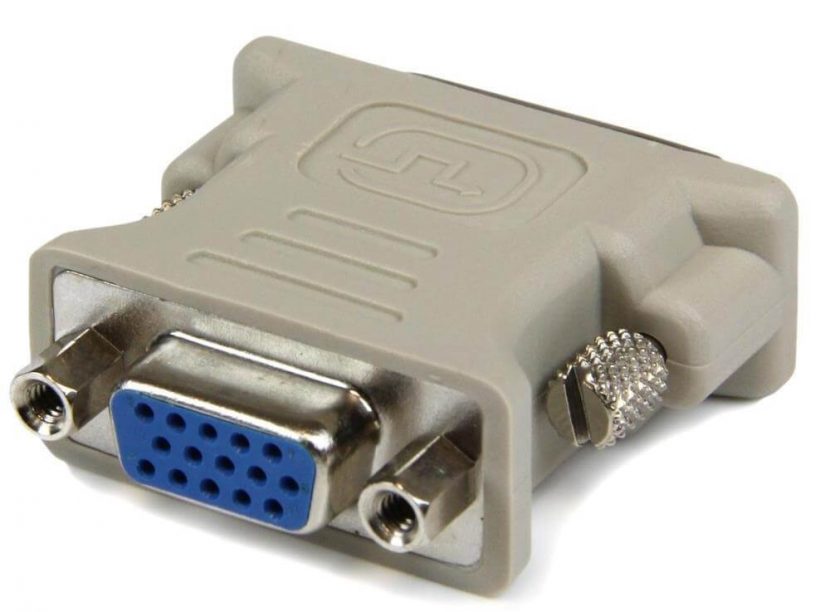
And if you still had VGA, you might need to get an adapter like the one above. Sadly these cards do not bring any adapters, but it might raise the price a bit if they did. Remember, it does not include one.
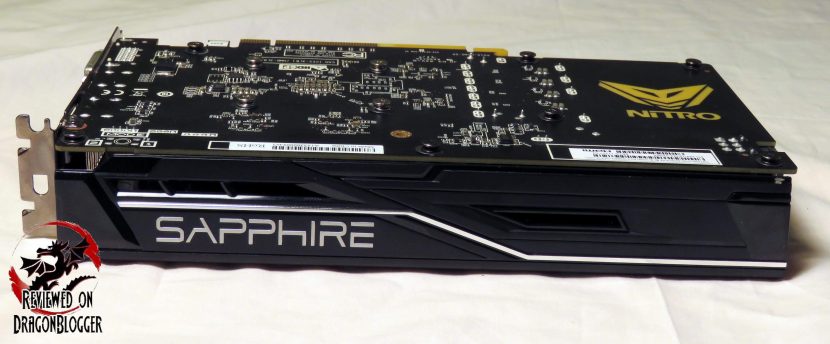
It has a basic no frills design, but it’s meant to be inside your PC so you may not look at it much. Once I install this into the system, I will show you the NITRO logo and how it glows. Let’s keep exploring this card.
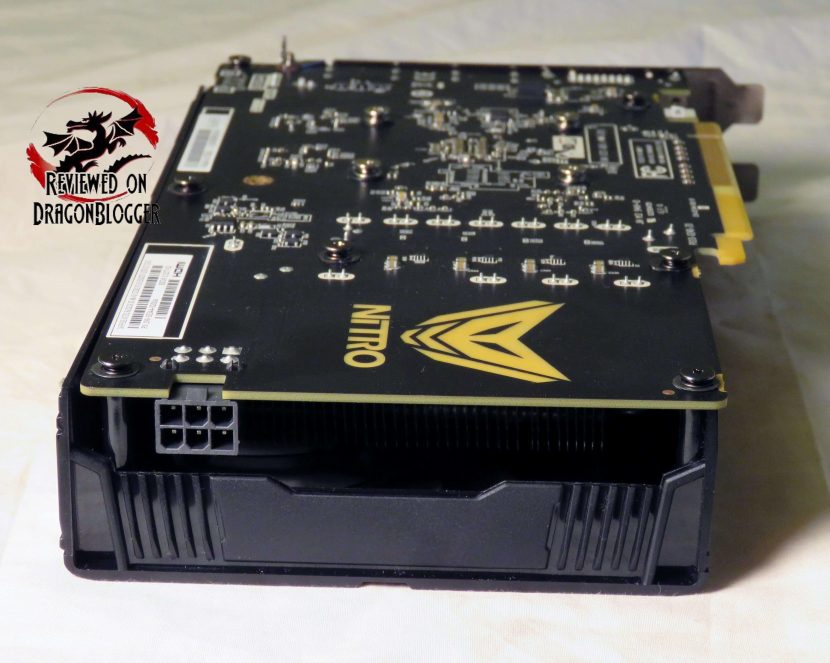
Along the back of the card, we find the single PCI-e connection, and it is only a 6Pin. This video card only requires a 450Watt power supply, keeping in line with the budget theme.
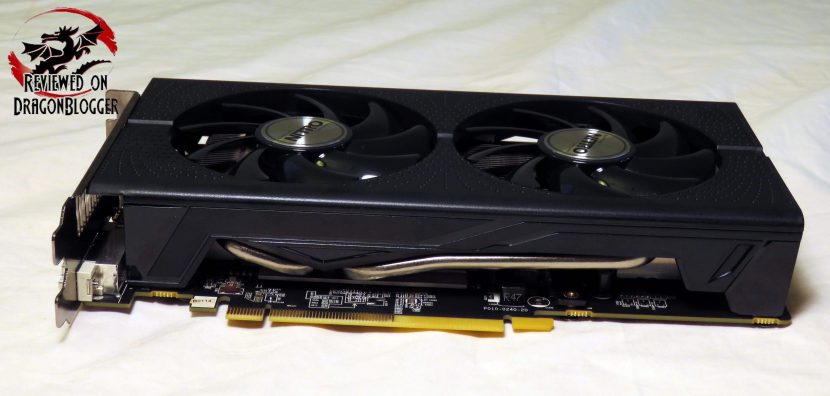
Along the bottom of the card, it’s pretty basic. We can see that Sapphire has an open air design here, allowing the heat to blow onto the board. We can also see that they have employed a dual heatpipe design to keep everything cool.
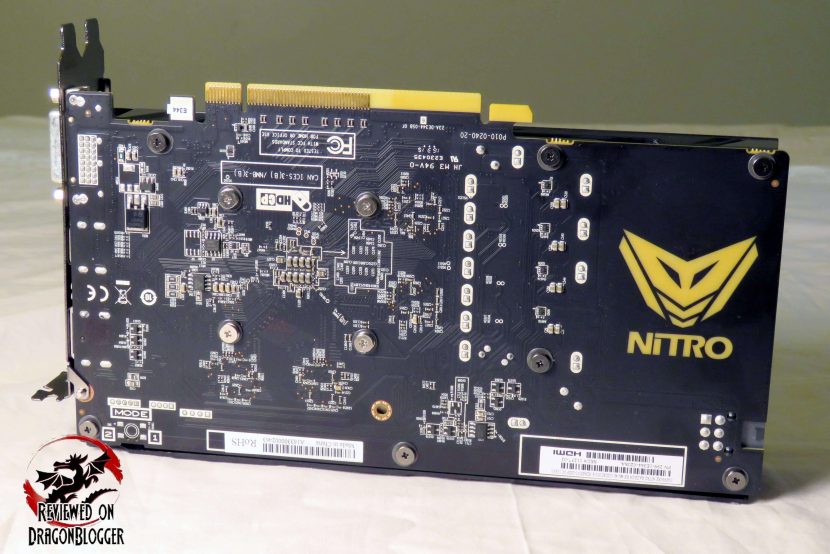
This is a budget card, so it does not have a backplate, but it does have a nice NITRO logo… it has a bit of a purpose of which I will show you a little later.
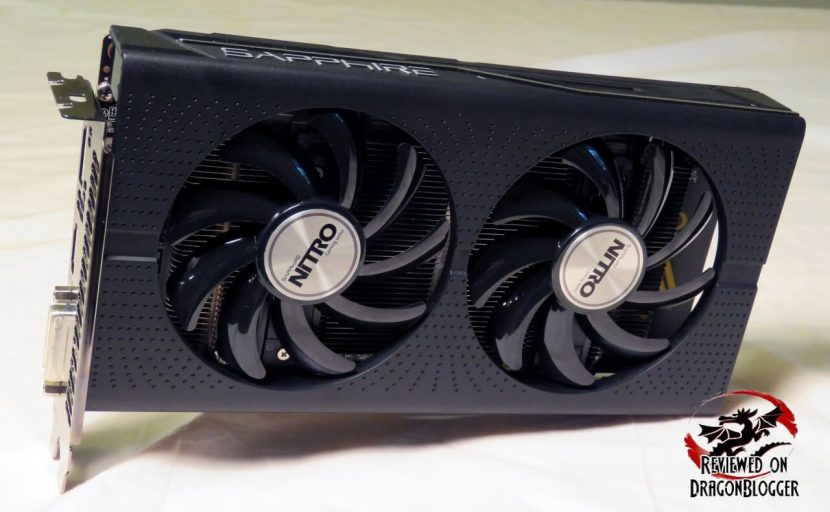
And finally, back to the top of the card, a basic looking card, but we know it will keep cool with those 2 fans.
OK, I want to get into some performance testing, so I am going to go ahead and install it. I recorded a video to show you how to do it, check it out on the next chapter.
[nextpage title=”Installing the Sapphire Radeon NITRO+ RX 460″]
We have all been at one point a noob, not knowing how to install a video card, RAM, CPU and the likes so I recorded this video to help you guys out. I have done quite a few videos like this, so once you are done with this one, stick around to find some more of them.
Installing the card on your own and other devices will save you tons of money, not having to pay people to install it for you. You may save enough to by another Sapphire Radeon NITRO RX460OC and you can Crossfire them and get even better performance.
Sorry I ramble, on to the video.
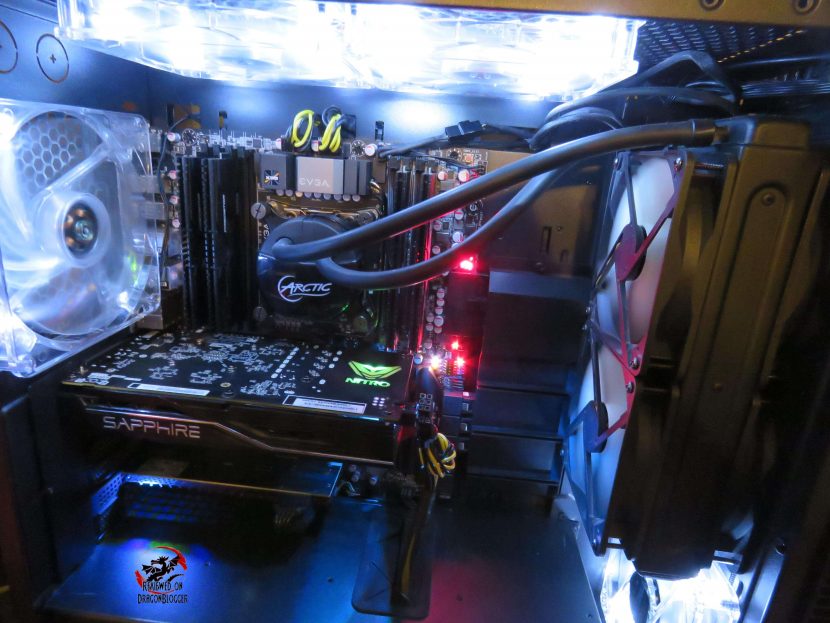
And here is what the find product looks like inside of my Anidees AI Crystal case. The case normally has a tempered glass plate and it is a bit tinted, so I removed it so that you can see it in all its glory and no glare either.
Quickies are not always bad, let’s move on to the next chapter where we can see how well or how poorly she runs.
[nextpage title=”Benchmarks, Performance, Temperatures and power consumption”]
While the video card is a budget card, the system is a little higher end but this actually might be your scenario. You might have bought the perfect motherboard, processor a memory… but now you don’t have enough money for a GPU… well this might be the best card to tide you over until you can get the latest and the great,… or maybe you chose to stick with it.
Anyway, check out my system specs to maybe put your own performance with this card into perspective:
- Anidees AI Crystal Case:https://geni.us/6NAIJBN?e0Ww
- Intel Core i7 5930K Processor:https://geni.us/6NAIJBN?4C8Itd
- EVGA X99 Classified Motherboard:https://geni.us/6NAIJBN?E9eamo
- Arctic Liquid Freezer 240MM CPU Liquid Cooling:https://geni.us/6NAIJBN?vEaJAf
- Kingston HyperX Predator 3000Mhz 16Gig:https://geni.us/6NAIJBN?w9kPe5
- Sapphire Nitro RX460OC Video card:https://geni.us/6NAIJBN?vd4v
- Samsung 850 EVO 500GB SSD:https://geni.us/6NAIJBN?1gf0fs
- Hitachi 1TB SATA 3G HD:https://geni.us/6NAIJBN?pU2QOo
- Patriot Ignite 480GB SSD:https://geni.us/6NAIJBN?eoPVsG
- Kingston HyperX 240GB SSD:https://geni.us/6NAIJBN?8leEDW
- Plextor 256GB PCIE SSD:https://geni.us/6NAIJBN?gVBR
- Cooler Master Silent Pro Gold 1200W Power Supply:https://geni.us/6NAIJBN?Umwm
- Microsoft Windows 10 Professional:https://geni.us/6NAIJBN?GYbBRY
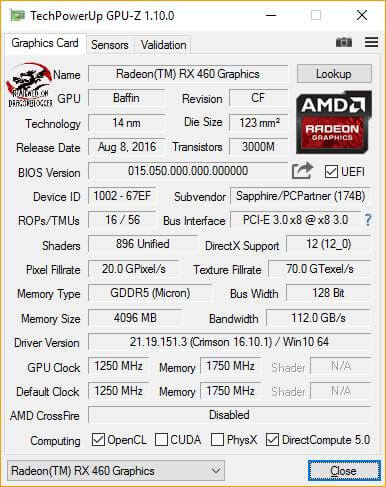
Ok, with all that, here are the specs of the card itself displayed on TechPowerUp’s GPU-Z.
Sapphire’s own utility TRIXX 3.0 provides a lot of the same information.
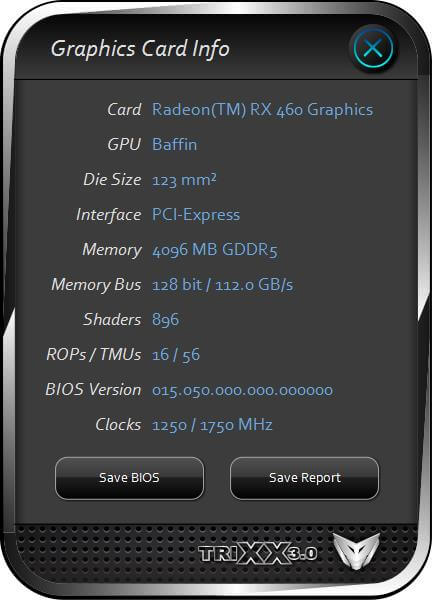
I will use this program later on to overclock the card and perform a few other action plus go into a lot more detail about the program so that you know how to use it. You can grab a copy of Sapphire’s TRIXX 3.0 here: http://www.sapphiretech.com/catapage_tech.asp?cataid=291&lang=eng
The Sapphire Radeon NITRO RX460OC 4GB card is based off of AMD’s Baffin chipset, part of the Polaris line. This chipset if based off of the AMD’s latest and greatest 14nm FinFET process which greatly improves performance and lowers power requirements of the cards in it’s series, a very welcome set of features.
For some reason, GPU-Z did not allow me to show you the number of Shaders, but thankfully TRIXX does, you can see them above.
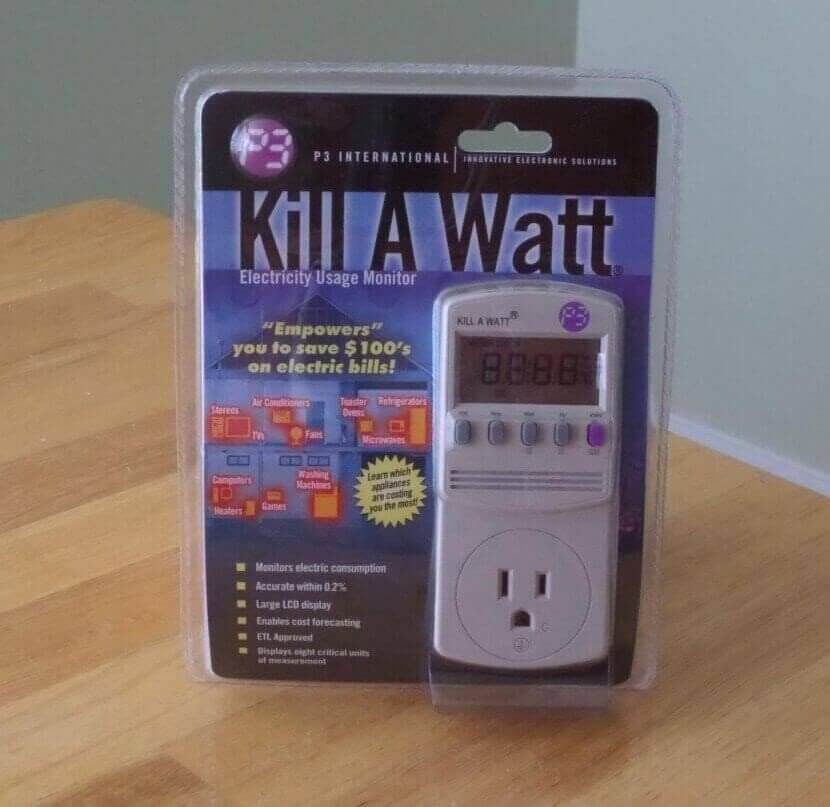
After this is the benchmarks, but I wanted to let you know first my testing process. To begin with, all of my benchmarks have wattage consumption listed. I test for Minimum, Average and Max power usage using the “Kill A Watt” by “P3 International”, a very handy little tool not only for testing PC power usage, but to see how much power annoying that can plug into a wall can use, can help you lower your power bill.
The programs I am using to benchmark are the following.
- FutureMark’s 3DMark Fire Strike
- Metro Last Light
- Thief
- Tomb Raider
- Ashes of Singularity
- Tom Clancy’s The Division
Later on, I also show you some gameplay of a few games, but let’s started benchmarking.


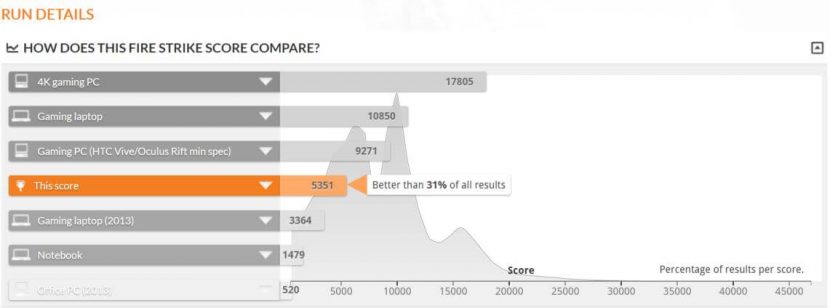
Budget GPU or not, the Sapphire Radeon RX460OC pulls up 31% better than all other results, that’s not bad at all. During the test, the lowest the power usage hit was 152Watts, the average was 238Watts and the max, a blip was 312Watts, that’s not bad at all. During the test, it hit was 61°C. Since the GPU hit 61°C, the fans turned on, but they are very quiet, I will show you how loud they are a little later in the review.
Sadly the scores could not be official because the drivers are not WHQL. The base drivers were, but when AMD ports them over to Crimson for performance, they usually do not send them off to Microsoft for WHQL certification, Microsoft charges for that.
Ok, let’s check out Metro Last Light.
Here are my Metro Last Light presets, for each benchmark I will present the presets, changing only the resolutions.
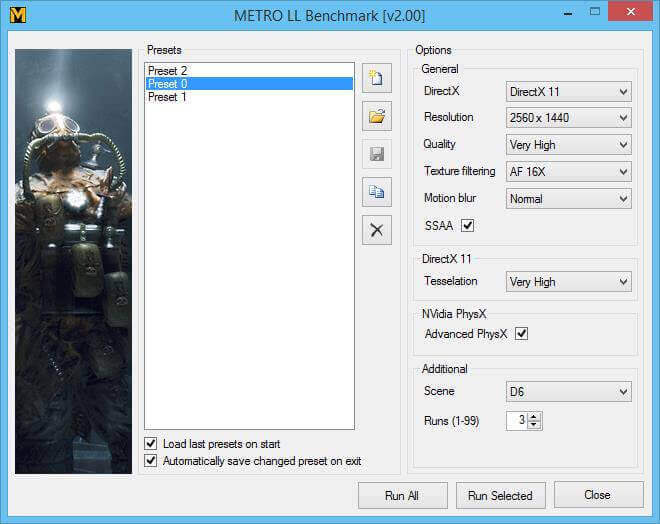
The only difference between “Preset 2”, “Preset 0” and “Preset 1” is changing the resolution between 2560×1440, 1920×1080 and 1280×1024. Below are the results from each.
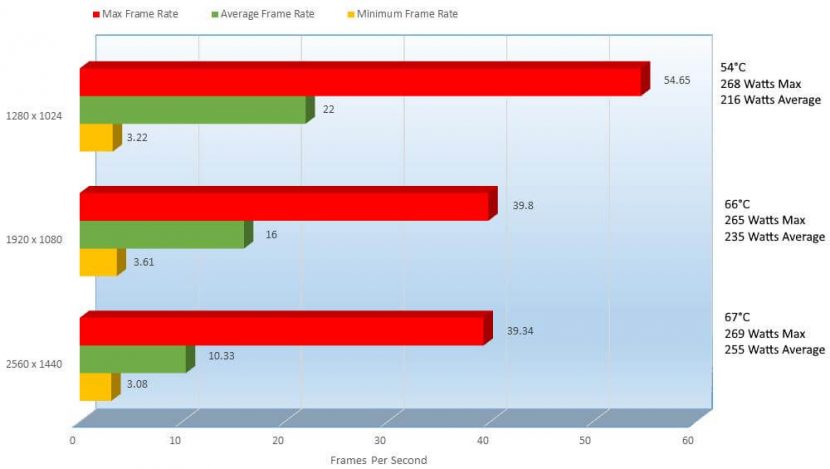
The performance here looks very rough, but you may be surprised to know that Metro taxes even the highest end card, so actually it’s not too bad here. Mind you at the settings I have laid out here, it is 100% not playable but if you were to take down the eye candy, surely it would be playable.
From 2560×1440 to 1920×1080, we can see that the frame rates increase by 5.67FPS a 43.07% improvement. Going from 1920 to 1280 we can see a 6FPS increase an improvement of 31.58%. From 1280 up to 2560 we can see both an increase in power consumption and temperate, a 21.49 increase in temperature and a 16.57% increase in power consumption.
The results here were a little loose since the gameplay was not good at all, but let’s move on to Thief to see if he can steal the show.

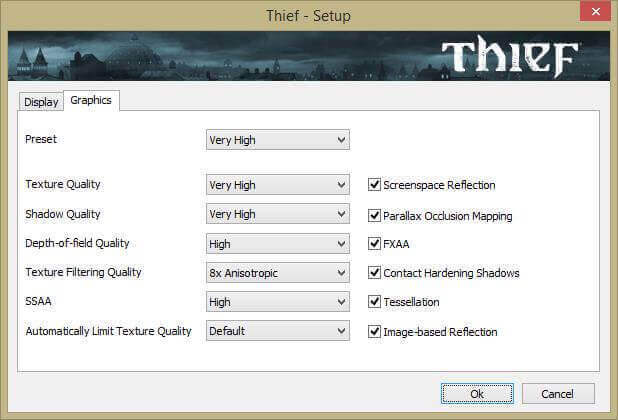
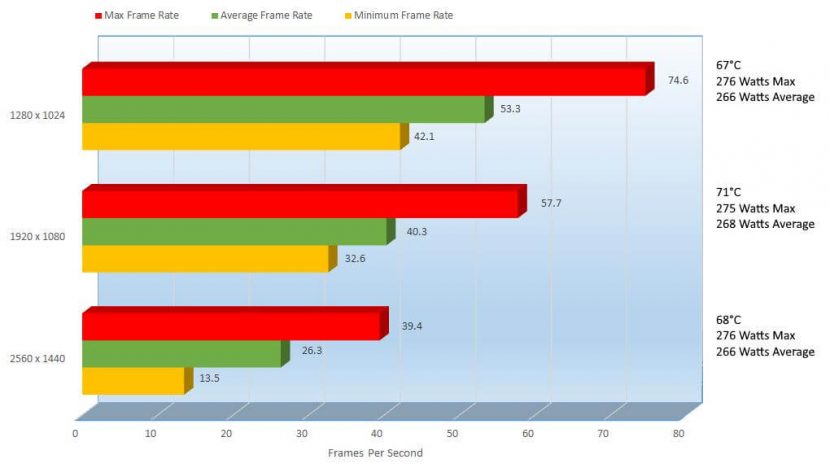
Thief gets very comfy showing the goods here now that things are much more playable. 2560×1440 while not playable at 26.3FPS, 1920×1080 comes at a much more reasonable 40.3FPS, peaking at 57.7 on average showing a 42.04% improvement in performance. Oddly enough, even though the resolution dropped, power consumption on 1920×1080 was actually .75% higher. From 1280×1024 is almost at the magical 60FPS coming in at 53.3FPS, 27.78% faster than the average on 1920×1080 and consuming .75% less wattage as well. 1280×1024 here is very playable, almost perfectly playable, but if you wanted to play at 1920×1080 all you would need to do is drop some eye candy and surely you would hit 60FPS as well.
This card is not looking too bad, but let’s see if Laura can pump up the score a bit.

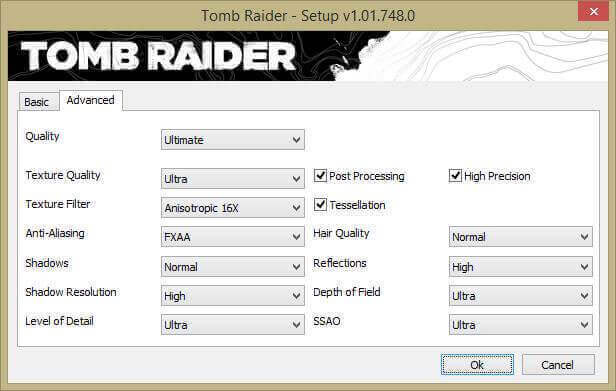
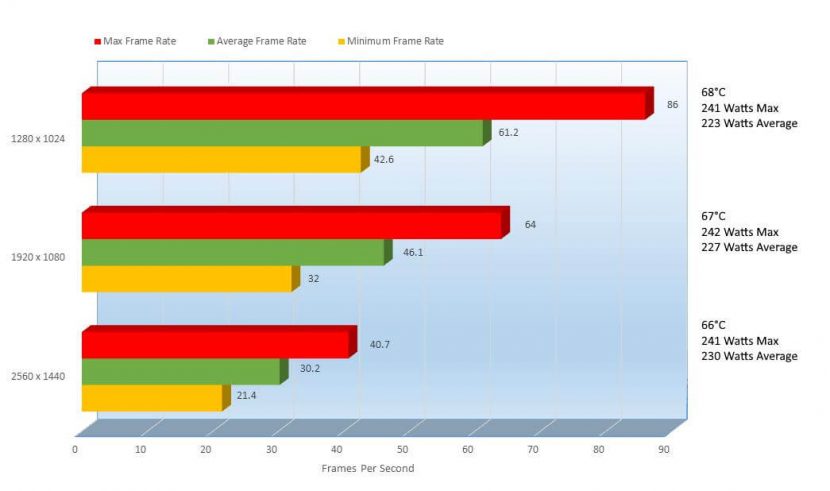
Alright, yet another decent score. At 2560×1440, she only hits 30.2FPS, but at 1920×1080 she is a lot more smooth at 46.1FPS, a 41.48% improvement and only a 1.31% decrease in power consumption. Now coming in at 1280×1024 we have better than perfect at 61.2FPS, an increase of 28.15% and a decrease in power usage of 1.78%. Like Thief, all you would need to do here is drop some of the eye candy and you could easily hit 60FPS at 1920. If your monitor can handle 1920×1080, I would suggest taking advantage of it. Let’s jump things into warp speed, or not… with Ashes of the Singularity.

For Ashes of the Singularity, I test in DX12 though you cant actually utilize the DX12 feature from inside of the game itself oddly enough, let me show you how I get to it.
From within Steam, right click on the title
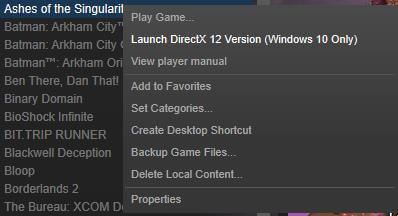
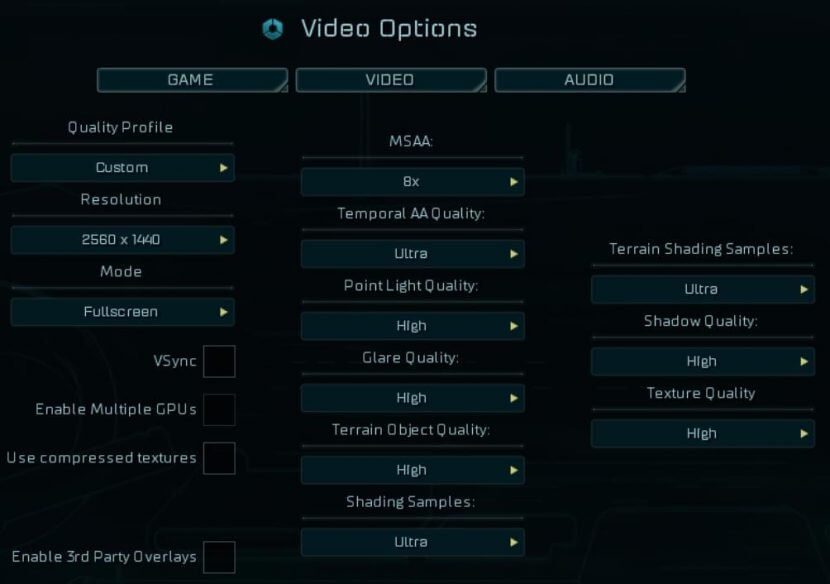
There you will see a drop down and you will find “Launch DirectX 12 Version (Windows 10 Only)”, then also as it implies, this will only work in Windows 10. After that, once it is loaded, here are my settings.
Also, you know you are benching in DX12 when you get this message when you click “Benchmark”
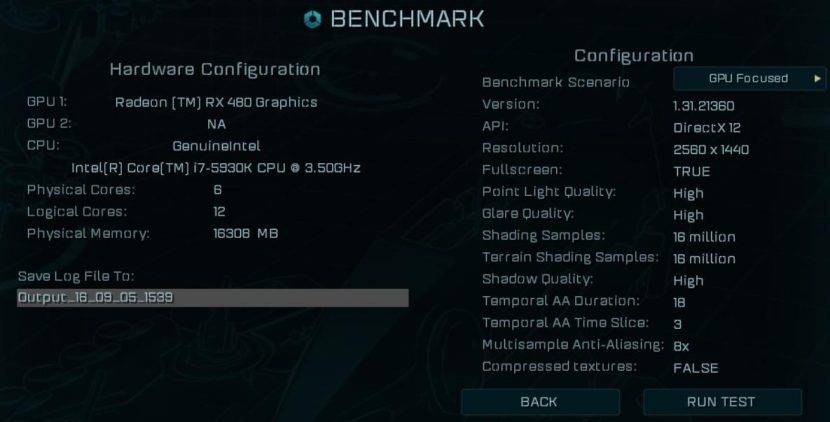
Notice under “API:” it reads “DirectX 12”.
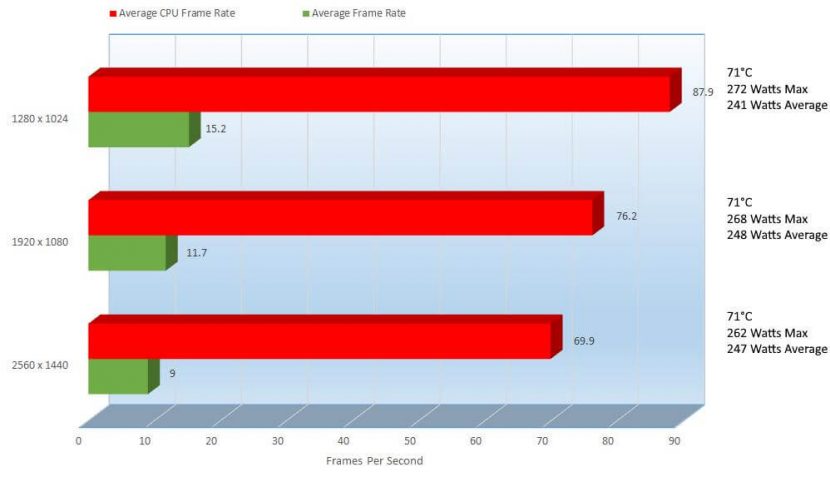
Ashes of the Singularity, heavily utilizes the CPU, you can see here its pegging the CPU very much. This game seems to chug a bit on any GPU I have thrown at it; either poorly optimized or truly tortures the GPU. While a DX12 title, I have not seen a GPU handle it properly.
OK, let’s jump to our final benchmark, Tom Clancy’s The Division.

Here are the settings I defaulted at, again afterwards only changing the resolutions. There are a ton of settings.
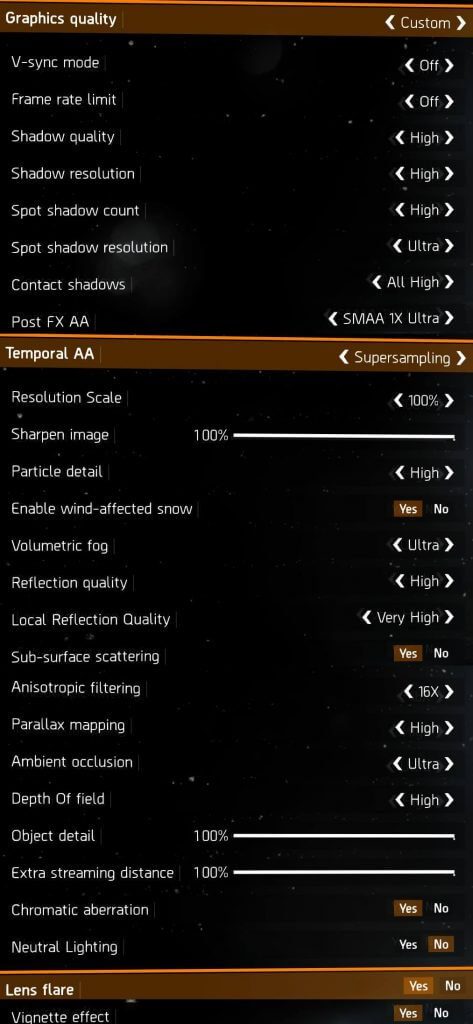
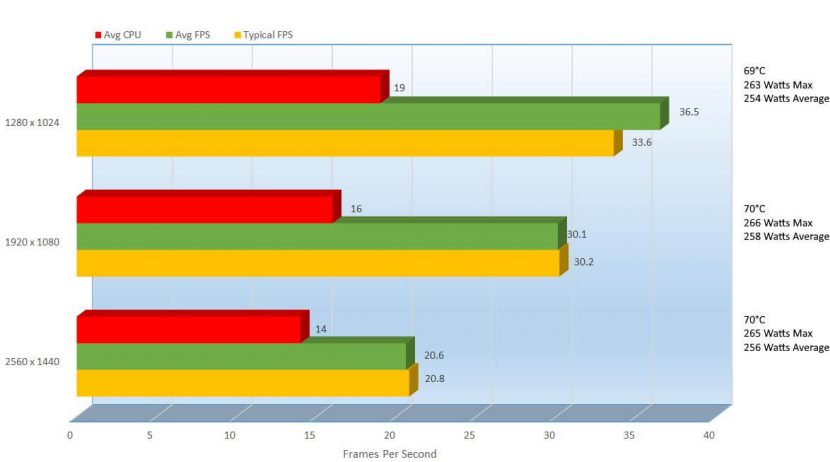
Like Ashes, The Division shows you how much CPU Utilization is occurring, but the reading is a bit more clear. We can see that this game utilizes both the CPU and GPU a little bit better, though it could be DX11 versus DX12.
We can see at 2560 to 1920 a FPS increase of 37.48% on the average FPS and only 1 more Watt consumed. It seemed to have fun much better than 30.1FPS but at 1280×1024 the 19.22% increase was noticed, coming in at 36.5FPS. The mixture of the CPU and GPU allows the game to perform much better than you would think at this FPS.
This next chapter shows a bit of game play, on some other games.
[nextpage title=”Gameplay and Performance”]
FPS and pictures are good and everything, but nothing is better than seeing it in action. So I will play a few games for you to show you what this card can do.
I played Paragon here, a pretty cool free MOBA tower defense type game, I liked it a lot and the graphics are pretty good too.
OK, that was actually pretty nice, I used Bandicam to record my videos and normally I would use the H264 (CPU) codec, the videos recorded under this setting looked like rainbows flowing in water, very odd. I switched to H264 (AMD APP) and everything recorded perfectly, but FPS took a big hit in this game and a few others.
With that explained, lets jump to League of Legends. Another free MOBA tower defense type game that’s loads of fun. Sadly I never played this one before either, but I quickly fell in love with it.
Then here, I play an oldie but a goody, I used to play the original Counter Strike for days on end, though this is the first time I played Counter Strike: Global Offensive and it was pretty good, I thought i had a key, but thankfully my buddy Andreas Niggemann had an extra he spared for me. Thanks again Andreas.
The Sapphire Radeon Nitro RX460Oc played this game super smooth, and it wasn’t even overclocked. Though it too suffered the CODEC fate and played much smoother when not being recorded.
The games ran all very well, and there will be more coming soon but I wanted to show you that. OK so you saw the stock performance, and especially being a budget card, we want to squeeze a little extra performance out of it, so let’s give it a try.
[nextpage title=”Overclocking Performance, Benchmarks, Temperatures and Power Consumption”]
OK, so before I provide the results, let me show you how I got there. First off, this is not a quick thing, to overclock correctly, you have to spend a few hours, have some patience, a paper and a pen because you will be there for a while recording your previous attempts.
Below, I will list before and after results of course of benchmarks but I will show reports from Sapphires TRIXX 3.0 and GPU-Z.
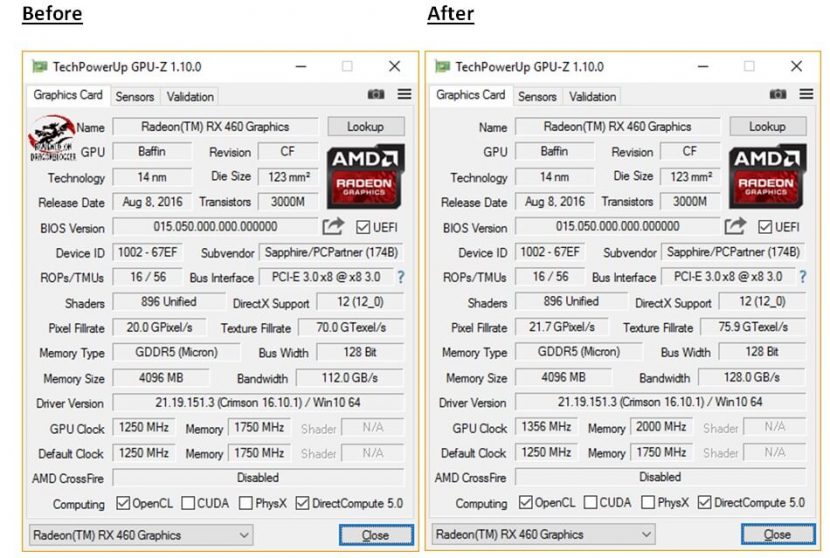
I was able to get 106Mhz from the GPU Clock and an impressive 250Mhz from the memory clock. With that, I was able to raise my bandwidth, pixel fill rate and texture fill rate. Surely I could have gone much higher, it was a great overclocking card, but I didn’t want to waste too much time overclocking, I wanted to give you my clocks and even confirmation as a reference. Please remember, if you buy the same exact card, the performance and overclockability may not be the same, yours may be able to clock higher or not very high at all, it’s the nature of the beast.
Before