
We are influencers and brand affiliates. This post contains affiliate links, most which go to Amazon and are Geo-Affiliate links to nearest Amazon store.
With the advancement of technology, everything is shifting towards digital. While DVD’s were widely used for more than a decade, over time, the usage of DVD’S has declined by a huge margin. If you have a couple of DVD’s lying around and want to make a digital copy of them, this article will guide you.
In most cases, transferring files from a DVD onto a computer isn’t as easy as simply copy-pasting it. The computer is unable to read the files of a DVD as the media files are usually in a format which common media players are unable to play. In situations like these, you will require a DVD ripper software to convert the files into a playable format. So in this article, we will be reviewing the TuneFab DVD ripper.
TuneFab DVD Ripper Features
- Rip DVD to MP4 and 300+ different video profiles.
- Rip DVD 6x faster than other DVD rippers.
- Many editing features such as trimming videos, 3d settings, taking a screenshot from a video.
- Preserve original audio track and subtitles.
- Take screenshots from your videos and save them as BMP, and JPEG.
How to Rip DVD with the TuneFab DVD ripper
The first step is to download and install TuneFab DVD ripper software. The software is available for both Windows and Mac. You can purchase the software from here.
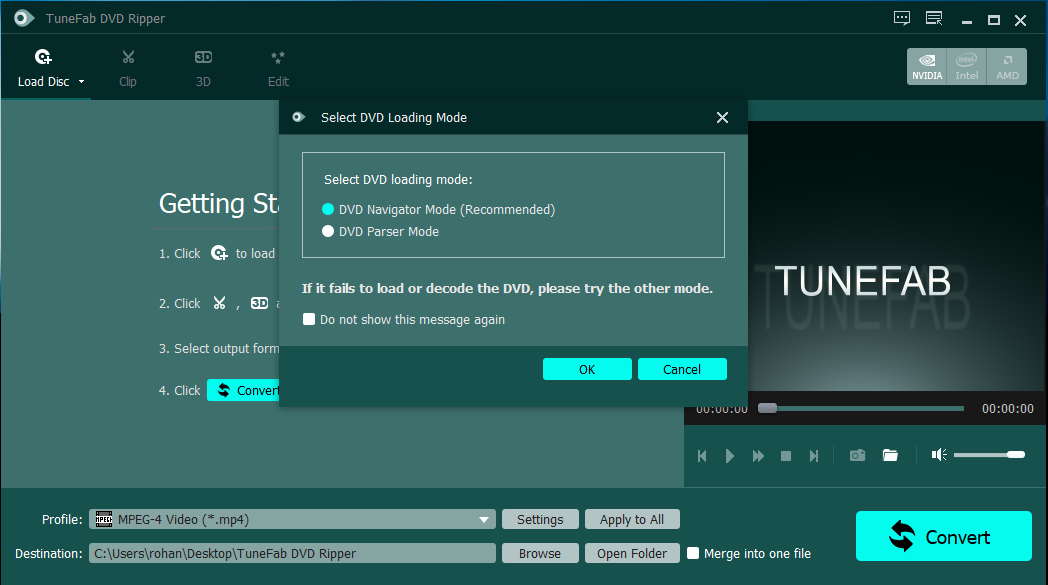
Load the Disc
After installing, launch the TuneFab DVD ripper software. To add the DVD which you want to rip, click on Load Disc. A new popup window will appear which will ask you to select the DVD loading mode. Select the DVD navigator mode and click OK. This will automatically load up the DVD from the DVD drive. The other way to load DVD is to click on the drop-down icon and choose from Load DVD folder or Load IFO files.
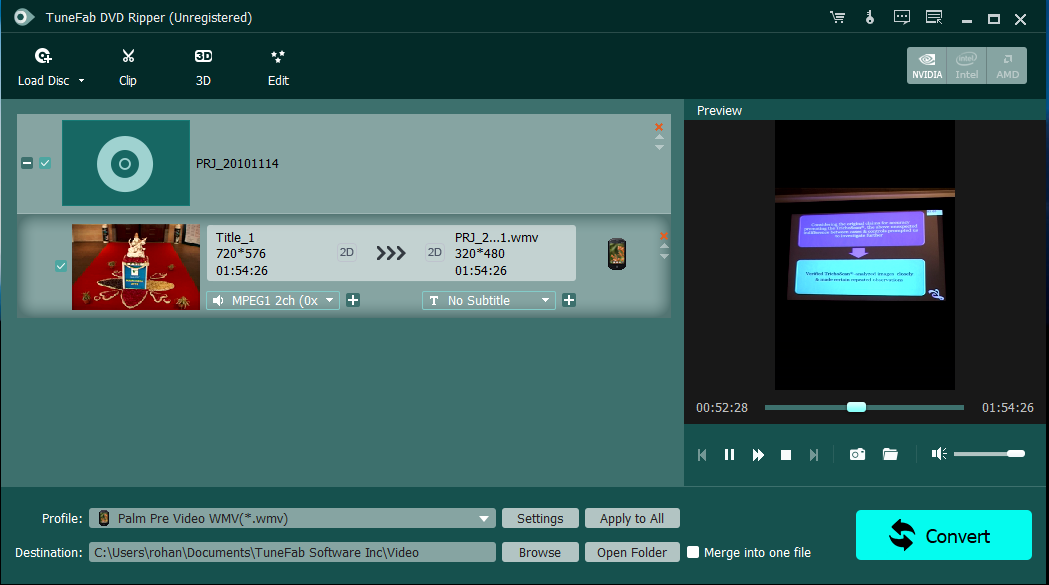
Viewing the Contents of the DVD
Once the DVD loads up, you will be able to view the contents of the DVD. If the DVD contains multiple videos, then you can select a particular video to edit on by ticking on the checkbox of the video file. On the right, we get a small playback window where we can view the source video. There are media controls available for easy playback. The camera icon beside the media control can be used to take a screenshot.
Choosing the Profile Settings
Choosing a video profile is the most important part of the DVD ripping process. To set a profile according to your need, click on the Profile bar. This will open up a list of hundreds of profiles to choose from.
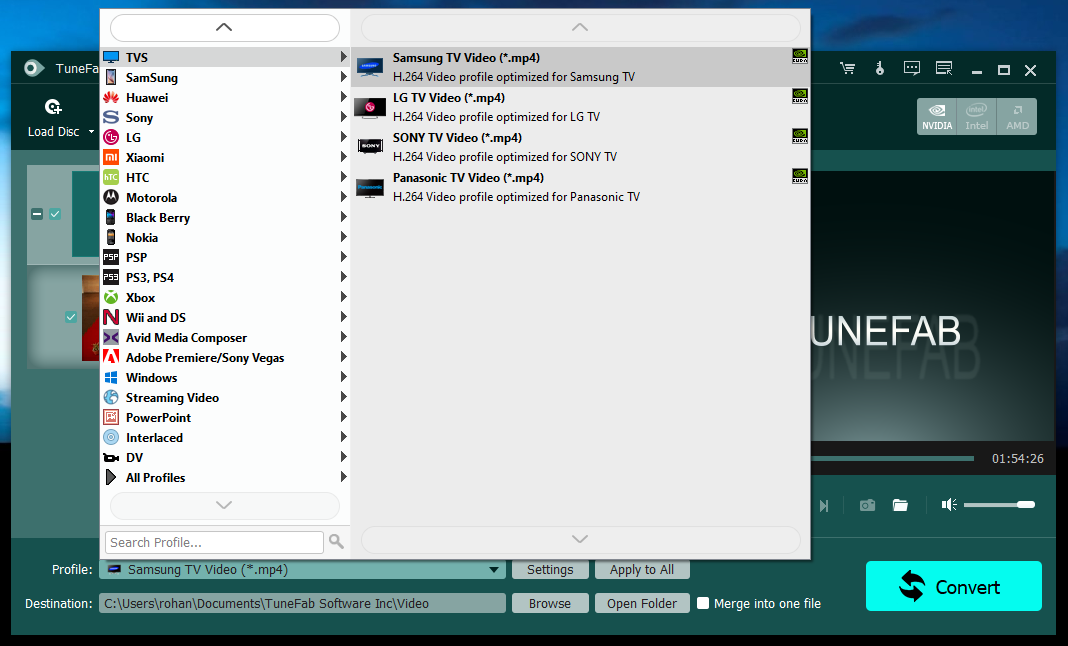
Then click on the Settings tab. In the settings tab, we get to edit the video, audio, and 3D settings. The settings tab gives advanced settings for the user to edit over the existing preset profiles.

Setting the Destination Folder
If you want to change the destination folder, you can do that by clicking on the Browse button. Then choose the location of your choice. Another method to permanently change the save location, you can do that by clicking on the Menu icon on the top right and then going over to Preferences. Here, you will be able to set the location of the output folder and the snapshot folder.
Editing your Videos
If you want to make any changes to your video before converting, TuneFab DVD ripper provides you with a couple of options. Let’s go over each of them. The first feature is Clip. As the name suggests, Clip allows us to shorten the videos. This is useful if you only need to extract a specific portion from a video. To clip a video, you can either use the start point and the end point sliders or you can use the timestamp to set the start and end points. Then click on the New Point button to create a segment. With this, you can create multiple segments from a video and convert it separately into multiple video files. If you want to merge the clipped videos, click the checkbox which says “Merge into one file”.

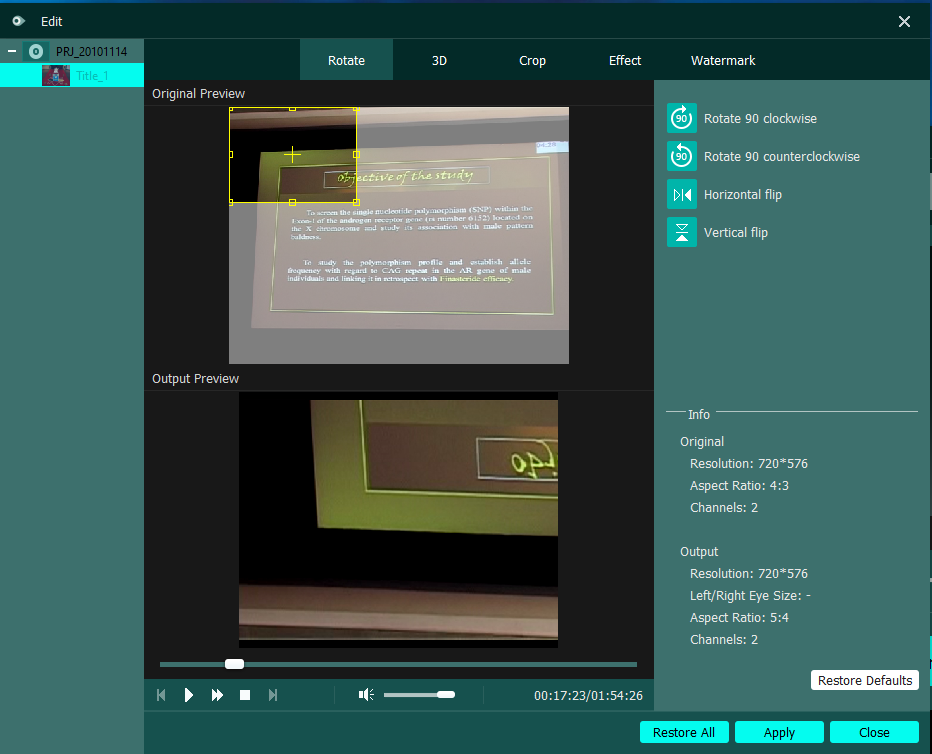
Lastly, we have the Edit menu. Here we get options such as Rotate, 3D, Crop, Effect, and Watermark. Under Rotate, we can either rotate or flip the video. You can enable 3D settings if you have a 3D TV. Under the effects tab, we can change the Audio volume and the brightness, contrast, saturation, and hue of the video. The Watermark tab allows us to add a text watermark or an image watermark to the video.
Converting the Video
Now that you have selected a video profile, adjusted the settings, trimmed the video, added some effects to the video, The final step is to convert the video. To rip the DVD and start converting, click on Convert. The conversion process will start, and once it’s done, you will be able to play them on your media player without the DVD.

Note: If you are using the trial version, you will only be able to convert 5 minutes of the video. If the video is less than 5 minutes, then you will only be able to convert half of it.
Verdict
TuneFab DVD Ripper is a great solution for all of your DVD needs. With the help of this software, you can rip your DVD and convert the files to MP4 with a few simple steps. Not only that, you can trim and edit your videos and even convert a video from 2D to 3D. If you have any queries or need any help regarding TuneFab DVD Ripper, contact TuneFab Support. They will be happy to help you out.
[P_REVIEW post_id=1090279 visual=’full’]
We are influencers and brand affiliates. This post contains affiliate links, most which go to Amazon and are Geo-Affiliate links to nearest Amazon store.
Hi my name is Rohan Jadhav. I am a guy who loves to play games and a tech lover. I like to be updated on all the tech stuff. I enjoy watching movies and I am currently doing a specialization course in VFX.