
We are influencers and brand affiliates. This post contains affiliate links, most which go to Amazon and are Geo-Affiliate links to nearest Amazon store.
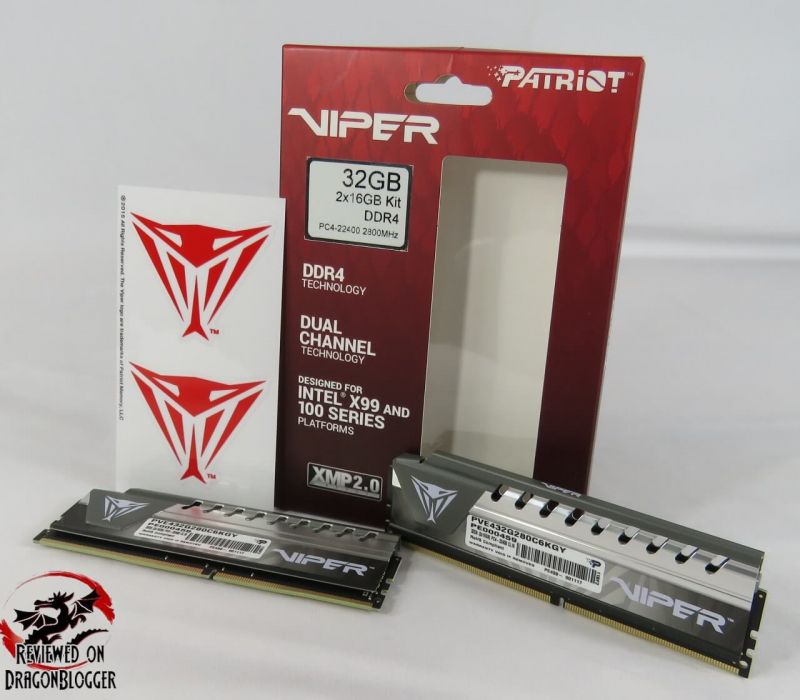
RAM, we all need it in our PC’s (yeah Macs are included here), Tablet’s, Phones, Consoles (Xbox One, PlayStation 4, Nintendo Switch, etc) and just about any device that computes. Windows 10 itself requires 2Gigs of it (64-Bit), if you are only running 2 Gigs in Windows you might be a little held back by what you can do. Top it off with a web browser, applications, games and the likes and you are going to need a lot more than 2 gigs, at least to be able to do more than 1 or 2 things. This review is on RAM, specifically the Patriot 32Gig 2800Mhz DDR4 PVE32G280C6KGY.
As your PC’s require more and more RAM for Audio/Photo/Video editing, gaming or plain old web browsing, CPU and Motherboard manufacturers will continue to support more and more, and happily so will RAM manufactures. Back in the day, you only needed a few kilobytes of RAM, then Megabytes, and now GigaBytes to run your operating system alone.
As Operating Systems, Applications and games get more complex they require tons too, it’s up to you to determine what your needs are though, today is 32Gigs too much? I am not talking about Servers here, I am talking about Desktop PC’s.
Before we get into all that, let’s take a look at some of the specifications of the Patriot PVE432G280C6KGY 32Gig DDR4 Kit.
Specifications
- Memory Type: DDR4 SDRAM 288-Pin
- Capacity: 32Gig (2 x 16GB)
- Speed: 2800Mhz
- XMP Speed: 2800MHz Optimized for Intel X99 and 100 Series Motherboards
- CAS Latency: 16
- Timings: 16 (tCL), 18 (tRCD/trp), 36 (tRAS)
- Voltage: 1.20
- ECC: No
- Multi-Channel Kit: Dual Channel Kit
- Buffered/Registered: Unbuffered
- Warranty: Limited Lifetime
- RoHS certified
With the specs out of the way, let’s get into an unboxing.

OK, now let’s take a closer look what was inside the box.
To start things off, Patriot includes 2 Viper stickers. You can stick them everywhere, but please stick responsibly.
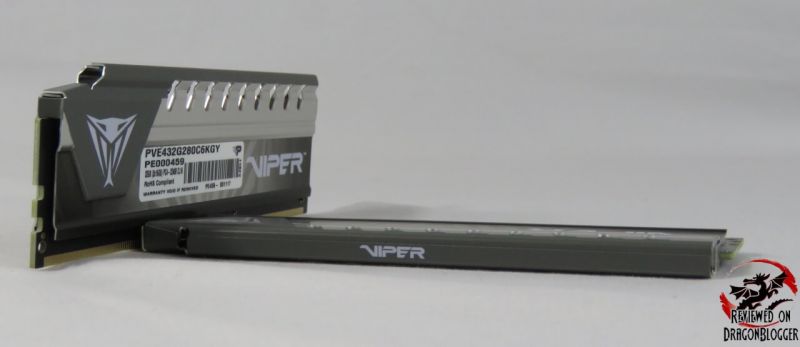
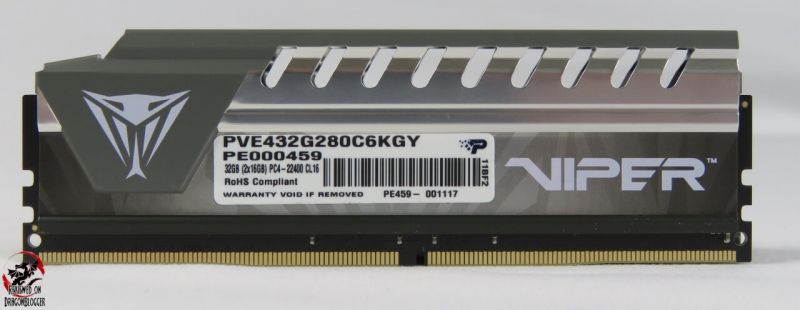
Then we have the RAM itself, again the Patriot 32Gig 2800MHz DDR4 PVE432G280C6KGY memory kit. Each stick holds 16Gigs of 2800MHz DDR4 goodness.
The kit as I showed you, brings 2 sticks of RAM, so in the X99 or 100 chipset, you have plenty of space to add more but this kit also works perfectly fine in the Intel’s Z270 chipset as well, which only have 4 slots. With 4 slots, of course you could another kit and have 64Gigs if you wanted to. I do recommend, if you plan on going for 64Gigs, try to buy them together to keep the IC’s as close to the same as possible, I will go over this a little later in the review.
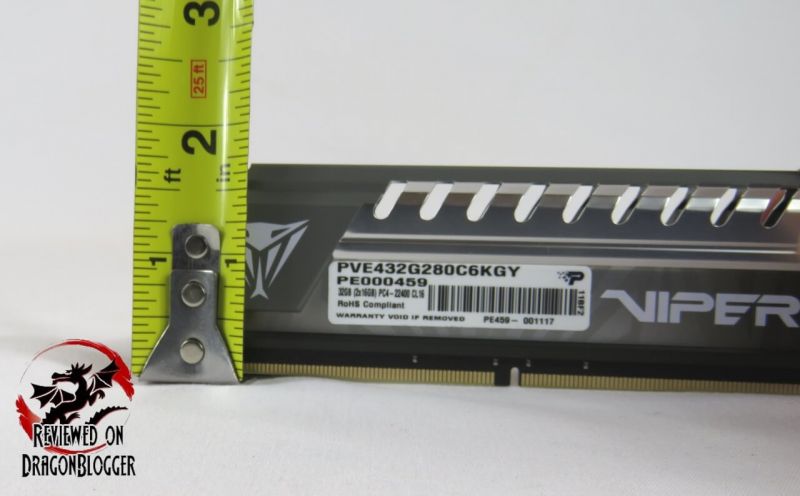
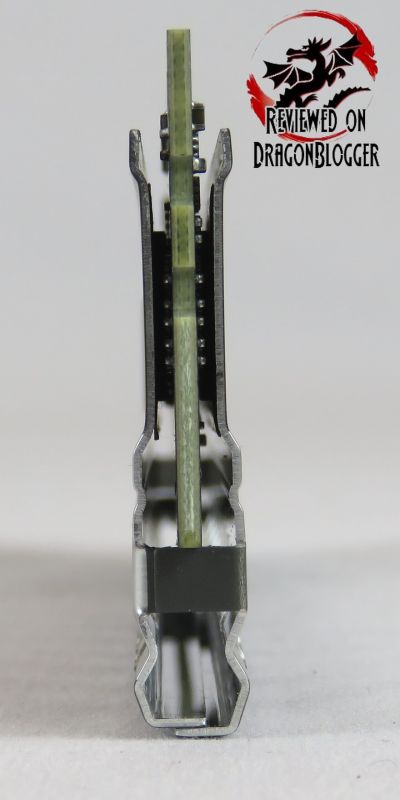
The memory with the heat spreaders stands a little over 1 ½ inches, almost the size of the PCB, so you should have no issues what so ever installing this into a tight spot. Check inside your own system and see how much space you have, it might be a little tighter than you expect with certain liquid cooling units or even air-cooled CPU heatsinks.
This kit comes with stock XMP speeds of 2800MHz with a CAS latency of 16. There is only 1 XMP profile, but that does not mean you can’t pump up the speeds a little more and we will go over that a little later in the review.
In case you don’t know how to install this memory and get started with your own adventures.
Now, before you can use the memory though, you have to install it. Don’t worry if you don’t know how, we will go over that now.
The easiest thing to install or upgrade on your PC is RAM, just make sure that your memory is compatible. You can check using your motherboard manufacturers QVL (Qualified Vendor List) to see if this memory is compatible, but don’t let that list be the end of your search. Many times, memory manufacturers don’t get their memory validated on all boards because it can come at a fee to them, it’s not always free and if they pay, you’ll end up paying for it too. This memory is not on the QVL for my EVGA Z270 FTW K motherboard, but there were others that had the same exact specifications, so that helped in the decision to review this RAM.
Even though installing RAM is easy, if you don’t know how to do it, you don’t know how to do it, but don’t let that detract you from starting with stick #1. Anyone and everyone who has ever built or upgraded their PC, had not done it before and they learned by taking the first step, want to take a step with me?
In this video, I show you how to install RAM.
Even with a fully built PC, it’s pretty easy and I hope that video helped you.
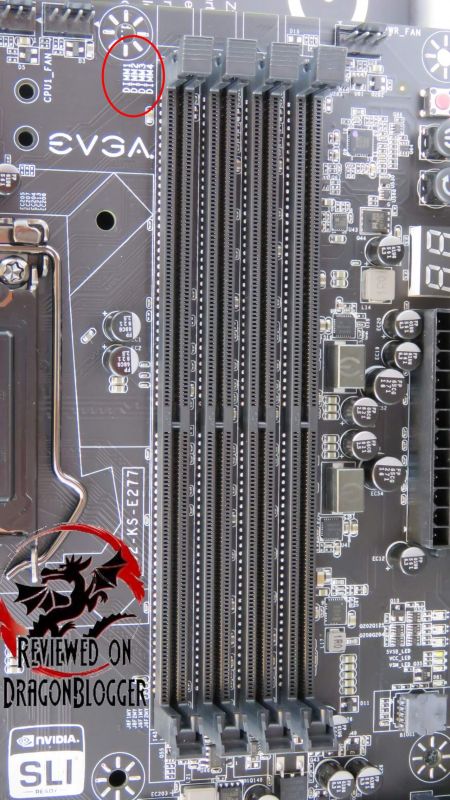
The chipset runs the memory in Dual Channel, and with 2 sticks of RAM it will run in Dual channel. The memory much be installed in even slots, so in this case, the memory will go in slot 2 and 4. I have circled in the picture above the DIMM slot legend on the EVGA Z270 FTW K motherboard, this will help you install the memory correctly. If you only have 1 stick of RAM, you must install it on DIMM slot #2, if not your PC will not boot up.
With that, if you decide to buy a 16Gig kit (2x8GB) with the intent of buying another set, you run the risk of the memory not working well because of the memory IC’s (Integrated Circuits). Memory manufactures like Patriot, Corsair, PNY, HyperX, etc,… all buy memory IC’s at times from different manufacturers to use in their own because the memory is cheaper at that time, memory prices fluctuate often. In order to keep prices lower for you they do this, without having to raise the prices much or at all. This means that when you buy memory at different times, you run the risk of using different memory IC’s that might not 100% work correctly with other IC’s.
Many times, the memory will work but if you try to overclock the memory beyond their XMP settings you will not be able to overclock as much or at all. If you do have different sets you have purchased over time, I created a video for you to see how to check for this.
Ok, this was a quick chapter, so once installed, I will show you how to configure the RAM.
This might not be the same for every motherboard, but this will give you a general idea of how to configure the RAM.
To start off with, as you start your PC start pressing the button to enter your BIOS which could be F1, F2, DEL, F12 or another key usually stated in your motherboard manual. For this particular board, the EVGA Z270 FTW K, it is the DEL key. You will want to do this as soon as you see the Motherboard manufactures POST splash screen, this is an example.
Once you enter the BIOS (Basic Input Output System), you will be greeted with a screen much like this, though again, it could differ on your motherboard.
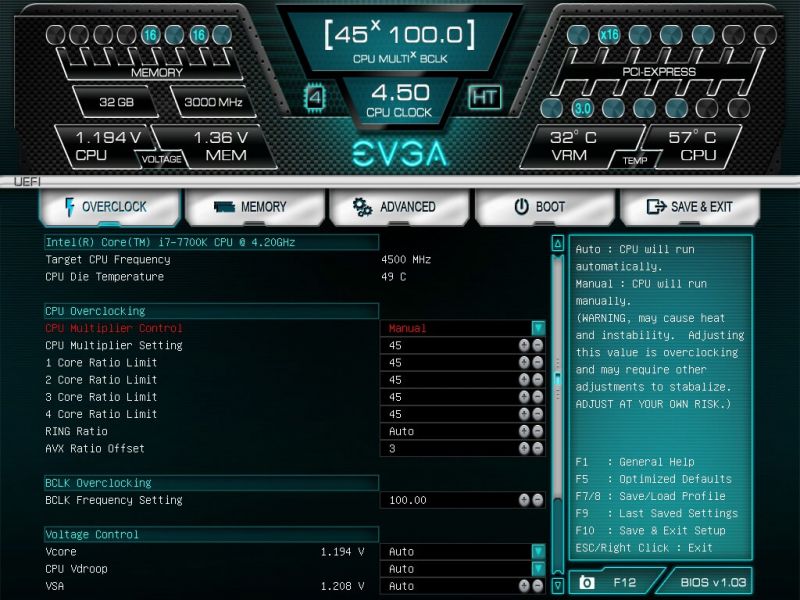
The main screen of your BIOS and surely overall look may look slightly different but I did want to start off by mentioning, I did over click the CPU, the Intel Core i7 7700K to its Max Turbo Frequency but nothing else was out of specification within the BIOS configuration. The stock speed of this processor is 4200Mhz, the Max Turbo Frequency is 4500Mhz.
In the BIOS, you will want to either click on or navigate to the “Memory” section.
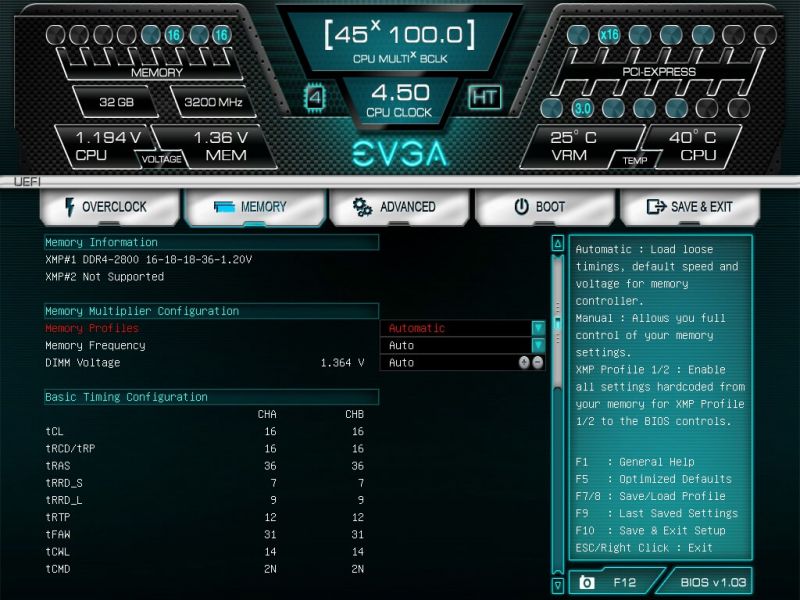
Here you will notice under “Memory Information” some XMP settings (Xtreme Memory Profile).

These are the settings programmed into the memory themselves to allow for easy configuration of the memory. XMP Profiles will set the CAS, RAS, TRAS, Memory Frequency and DIMM voltage so that you don’t have to go crazy finding all of these. You will find that XMP profiles are actually overclocked memory profiles above what the memories JEDEC (Joint Electron Device Engineering Council) standards and is designed to help you reach basic and thoroughly tested overclocks.
Intel has a certification program that lets memory vendors (like Patriot) test their products for compatibility against Intel XMP to ensure you get a quality product. Even though the memory is overclocked with XMP profiles, you can still pull some extra performance out of them of which I will go over a little more later in this review.
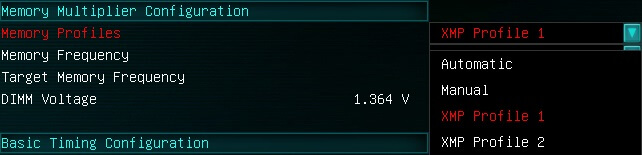
In the screenshot above, when you click on the “Memory Profiles” drop down, you will notice there is a 2nd XMP Profile, but Patriot chose not to add a second one. This is completely fine but I thought I would mention it. There is also a “Manual” selection but there is no reason to go there in my opinion, what do you think?
After that, you are done, just click “F10” to save and exit, usually it’s F10 but it may be different on your board and BIOS. Once you are done and saved there you are ready to boot into your Operating System and start taking advantage of your new RAM.
Also, because you have a lot of RAM, you can disable your paging file, which takes up tons of space on your C drive, unless of course you changed where that file resides.
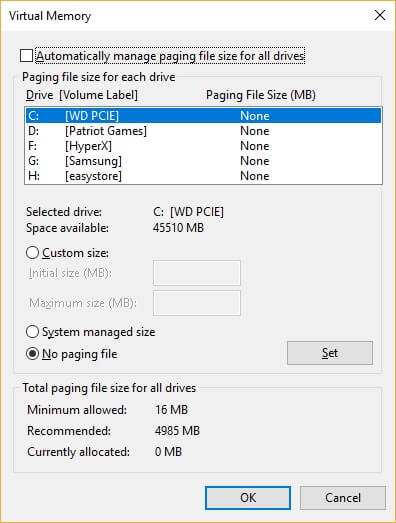
Here is my paging file disabled.
To disable your paging file in Windows 10, right click on the “Start button” then click on “System”, this would open up the “System Properties”. Within “System Properties”, click on the “Advanced” tab then under “Performance” click “Settings” which will open “Performance Options”. Under “Performance Options” click the “Advanced” tab then click “Change” under the “Virtual memory” section which will bring you to the screenshot above.
In the “Virtual Memory” window, select the drive that has the paging file, then click “No paging file” and click “Set” and click OK. This will require you to restart your PC for the changes to take effect, make sure you restart. Now you will improve your overall performance because it will reduce the read/writes to the hard drive/SSD and increase the memories performance. Make sure you only do this if you have 16Gigs or more, here since we have 32Gigs we are good to go.
Now that we are done here, let’s do some performance testing.
In this section, we will do some benchmarking so that you see what kind of performance we get from this memory. Below I will mention what pieces of software I used for benchmarking, testing and readings.
I will explain below why I use these pieces of software, let me know if you agree and if there are different tools you would use and why.
- 3DMark/TimeSpy:While not a benchmark for memory, it does provide overall system performance. It does of course steer more in the direction for gaming in the line of video but memory speeds do play a role in its performance.
- 7Zip: 7Zip is a tool for file compression, it also provides a tool to benchmark the speed of your processor and RAM measured in MIPS (Million instructions per second). The Compression speed test relies heavily on your RAM latency, Data cache size and speed and TLP or translation lookaside buffer. The TLB is a memories cache that stores recent translations of virtual memory into physical addresses for faster retrieval of that cache.
- Decompression relies more on the CPU’s integer operations and very little on memory and its own cache, but it is wrapped in the test. The performance is based off of MIPS (Million Instructions per second. The overall score is calculated from the measured speed of its calculations. I run this test for 100 passes, not only test get a better tested score but also to test system stability under each configuration.
- AIDA64: Is a benchmarking suite that can benchmark the entire system, but I will focus this test only on Memory, since we have a few other suites benchmarking everything. The memory test here benchmarks reading, writing with data transfer bandwidth and latency.
- PCMark 10: Does not focus on memory specifically, memory and memory speed will affect its end result. PCMark has various testing packages, the Complete PCMark 10 test, PCMArk 10 Express and PCMark 10 Extended. Some packages are self-explanatory; I will focus on the Complete Benchmark.
- The Complete benchmark are all different types of workloads and are more made for the modern office. The benchmark measures performance with test based on real-world tasks and activities allowing to see what benefit every tweak can bring to overall system performance all are very memory centric, including overall system performance.
- Sisoft Sandra: Sandra is also a suite that can potentially benchmark the entire system and can also be used for diagnostic purposes, like most if not all of the previous software titles mention. For memory, I will be running Sandra’s Memory Bandwidth and Latency tests.
For your reference, I will list my build as well to help you compare results with your own system.
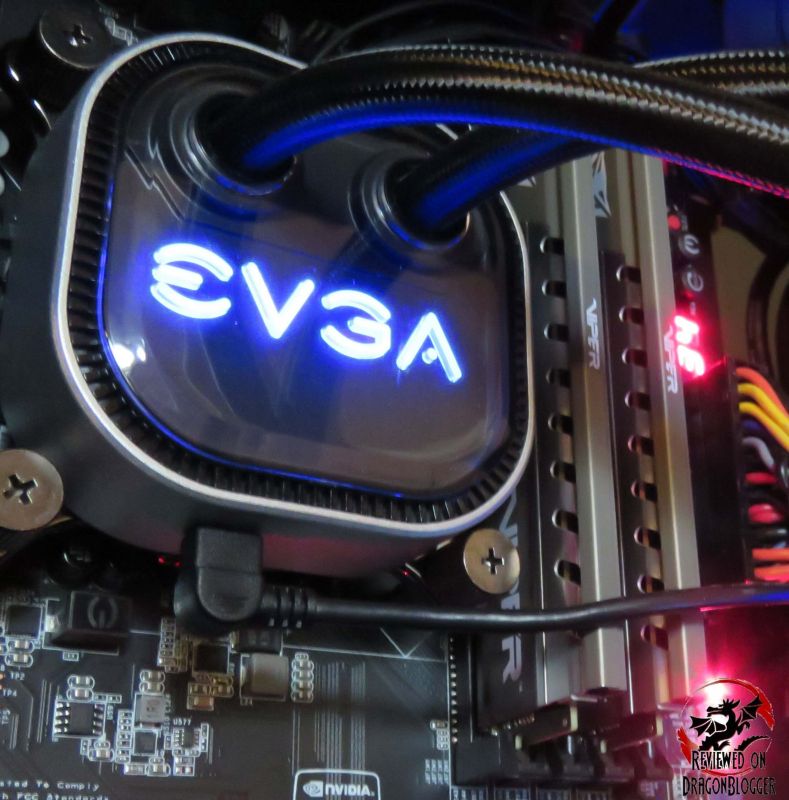
- EVGA CLC 280 Liquid CPU Cooler: https://geni.us/6NAIJBN?m4F6
- EVGA Geforce GTX1080 TI FTW3 Gaming iCX Video Card: https://geni.us/6NAIJBN?FXs7
- Intel Core i7-7700K Kaby Lake BX80677I77700K Processor: https://geni.us/6NAIJBN?5e87
- EVGA Z270 FTW K, 132-KS-E277-KR Motherboard: https://geni.us/6NAIJBN?xNpK
- Patriot Viper Elite Series DDR4 32GB 2800MHz: https://geni.us/6NAIJBN?iGZs
- COUGAR Panzer ATX Case: https://geni.us/6NAIJBN?U5dr
- Windows 10 Professional: https://geni.us/6NAIJBN?GYbBRY
- WD Black 512GB PCI-E NVMe M.2: https://geni.us/6NAIJBN?9H46
- WD Blue 500GB SSD WDS500G1B0A: https://geni.us/6NAIJBN?udvK
- Samsung 850 EVO 500GB SSD: https://geni.us/6NAIJBN?1gf0fs
- Kingston HyperX 240GB SSD: https://geni.us/6NAIJBN?8leEDW
- Patriot Ignite 2.5″ 480GB SATA III MLC SSD PI480GS25SSDR: https://geni.us/6NAIJBN?eoPVsG
- Cooler Master Silent Pro Gold 1200W Power Supply: https://geni.us/6NAIJBN?Umwm
Here are the base XMP scores, we will use them later in the review for comparison. Remember, XMP speed is here is 2,800Mhz.
Let’s start off with 3DMark Fire Strike
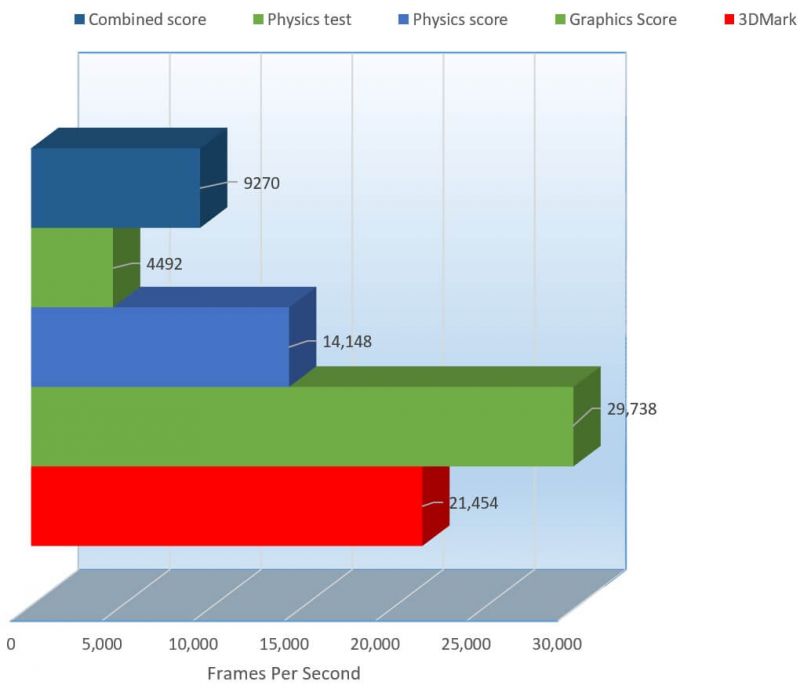
A base line score on the base XMP settings shows a decent score here. The baseline to you and I, only shows the graphical performance of the EVGA Geforce GTX1080 TI FTW3 Gaming iCX, but we will see more soon. On to Time Spy.
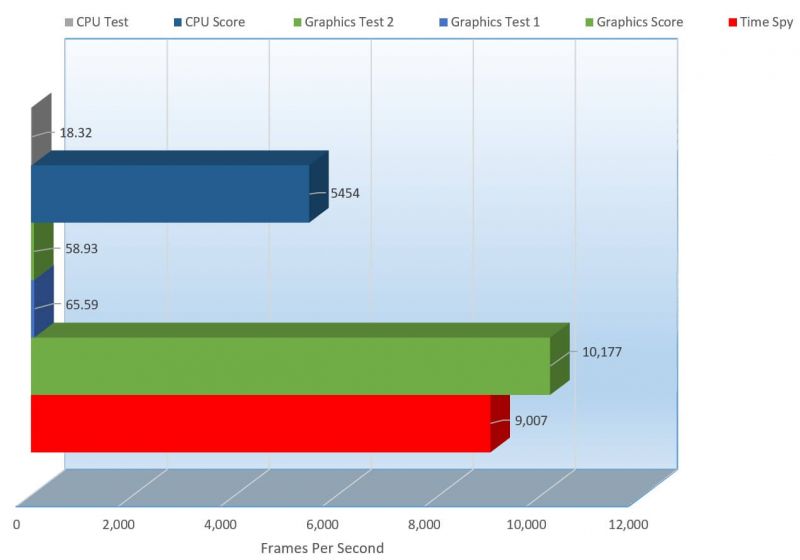
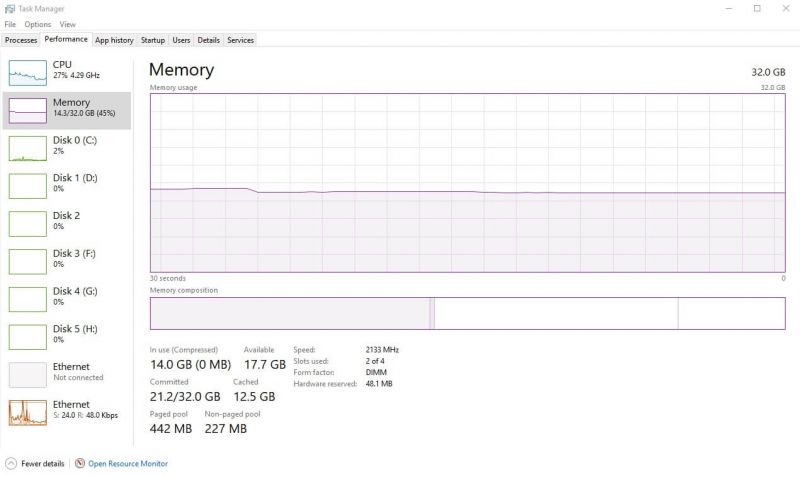
Time Spy, like 3DMark, is mainly used for gauging graphical performance of your system but system RAM plays a decent hand in this. While graphic test mainly used Video RAM, or in this case GDDR5, while these tests are running, the overall system gets put in a bit more strain. Utilizing resources like DirectX, Paging File, Hard Drive, the PCI-E slot, Motherboard, RAM, Video Ram, Video Card, Power supply and more, below shows a Task Manager View of a run of Time Spy.
During the test, the section captioned in Red, constantly goes up and down. I noticed during the test, the “Committed” utilized as much as 11Gigs of RAM, of course the other sections there were impacted. In the video I have, it only drew about 7.3GB.
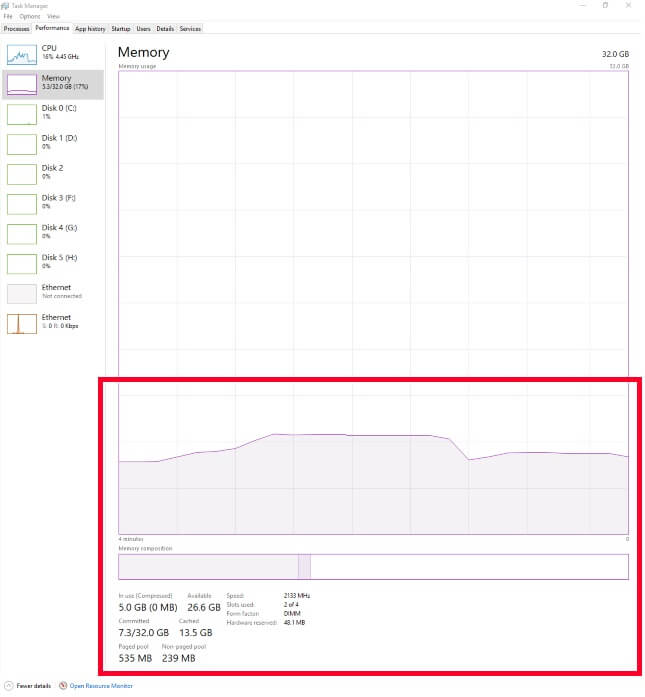
Check out this video on running Time Spy, so you can see just what I meant.
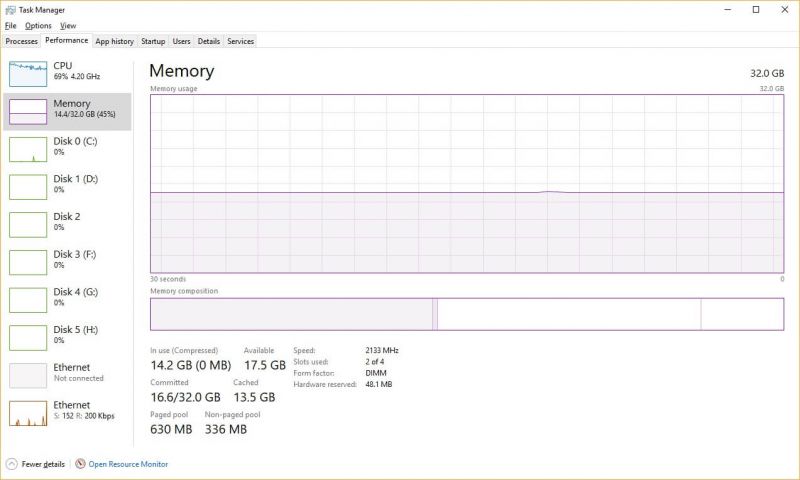
I also took a screenshot of Task Manager rendering the video in WonderShare Filmora, which is also what I used to capture the video.
Let’s jump into PCMark 10.
PCMark 10
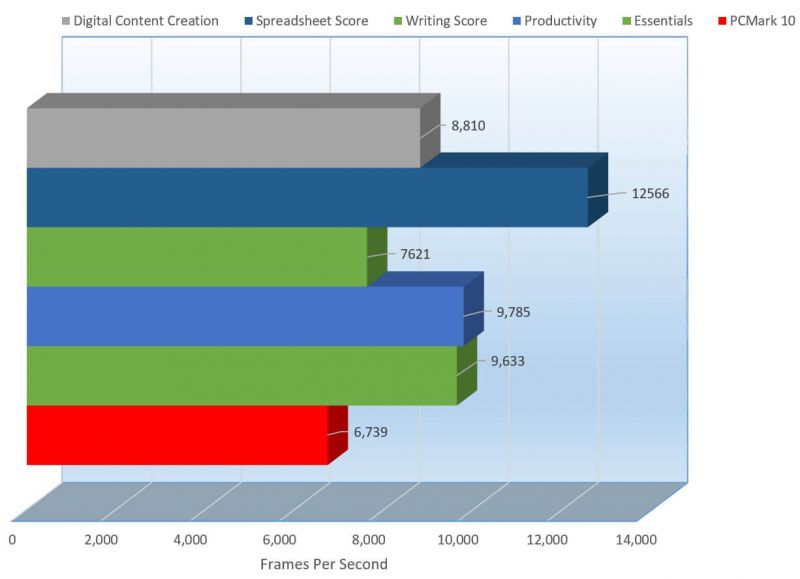
A base line score on the base XMP settings shows a decent score, PCMark shows an overall system performance. Remember, this is a baseline score, let’s check out 7Zip results.
7-Zip Benchmark
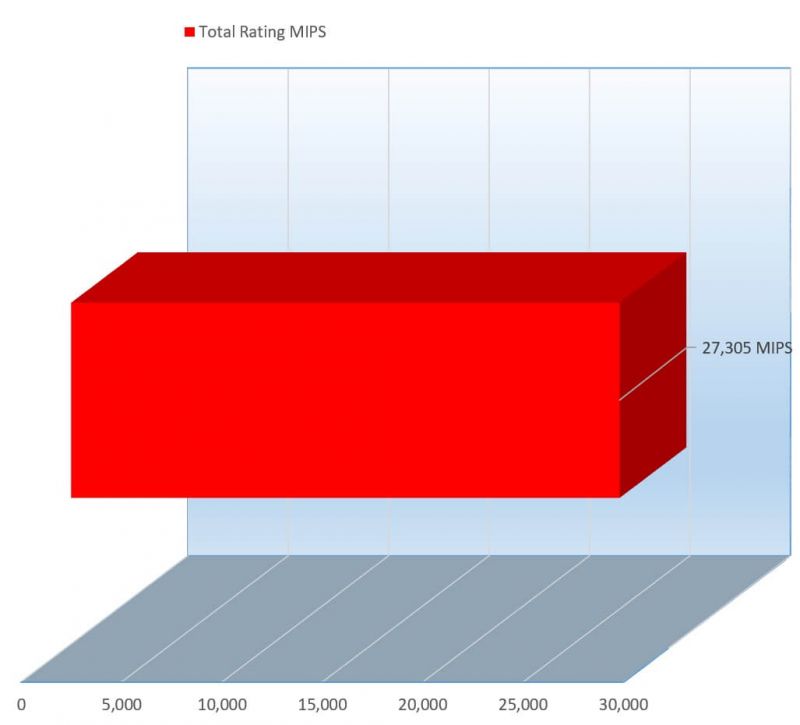
Single score means nothing and it looks a bit odd, but we will get there. The total rating the result from a Decompression and Compression test. Let’s check out AIDA64.
AIDA64 Cache & Memory Benchmark

AIDA64, give us a reading only on the memory, and it does a good job. It shows here the latency in when the CPU reads data from system memory. How quickly the memory is Read and who quickly it writes during data transfers and then it also measures the memory copy rate during those data transfers. Higher scores mean better performance with the exception of memory latency, the lower the score on memory latency the better the performance.
Next up is Sisoft Sandra.
Sisoft Sandra
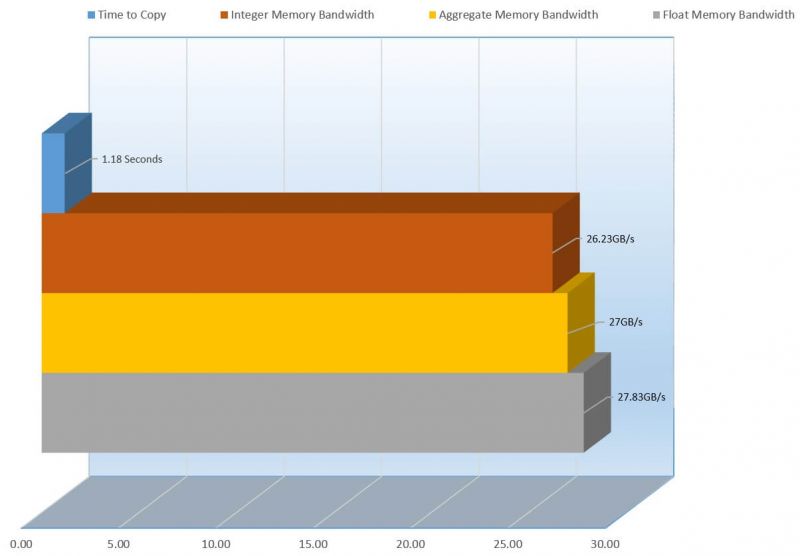
Looks like initially, the memory is plenty fast, copying at a mere 1.18 seconds. We will have some more comparisons to show very soon and see how much we can improve all the others.
With that, this is just the starter, in the next page, we will overclock the memory some and provide comparisons. I know this one was boring, but the next will surely entertain a bit more.
Being that this memory only has one XMP Profile, led for a pretty boring first benchmark, but at least it provided a base on which we can build upon to see where we can get with very simple overclocking. We won’t get incredibly in depth with the overclocking, but I will show you all I do.
In this review, we take the base XMP Profile at 2800Mhz, to 3000Mhz, 3200Mhz and finally 3333Mhz. Surely, we can go higher, but I did not want to spend too much time overclocking more. Overclocking as we have, we have gone 533Mhz above the baseline XMP, not bad right?
I will show you the settings I have made for each of the overclocks I listed above below.
3000Mhz
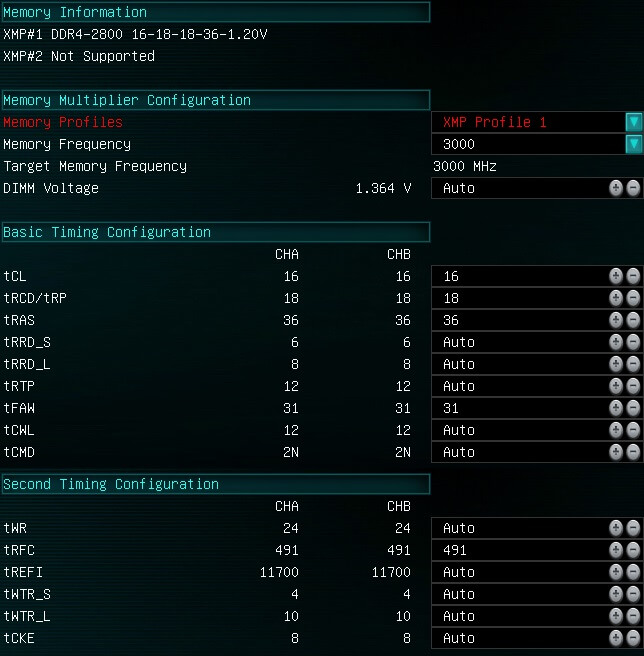
At 3000Mhz, I was able to keep all settings the XMP profile provided without having to raise a single one other than the frequency.
3200Mhz
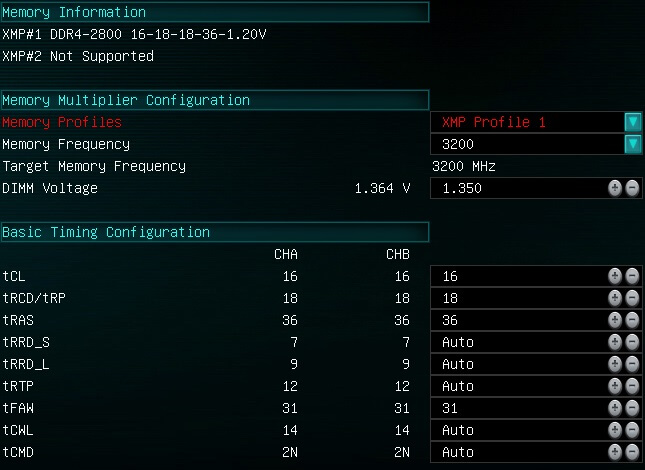
At 3200Mhz, I was able to keep everything the same, but in order to get the PC stable and able to boot, I had to raise the voltages a bit. XMP states the memory is at 1.20V but is you notice, the automatic Voltage timer read 1.364, so I raised it from auto to 1.350, to see if I could undercut it a bit and it worked fine.
3333Mhz
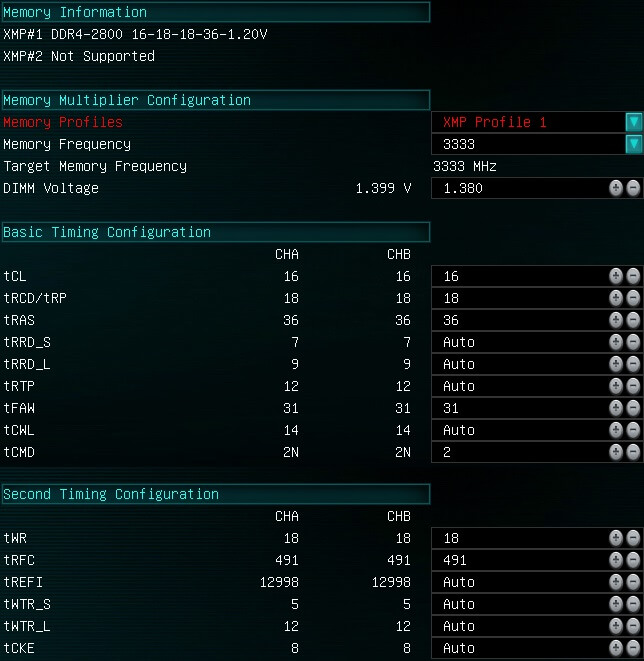
3333Mhz proved a bit more challenging. No matter how much I raised the voltage, the PC would not start, but a warning, you should not raise the voltage too much as it could cause damage to your CPU or RAM, so be careful. At that point, I knew it was not a voltage issue but a timing issue. So I had to set the tCMD from Auto which was already at 2N to a fixed 2N then set the tWR from an auto 24, to a fixed 18, which was a bit odd because XMP should have set this to 18 but not an issue. The tRFC seems amazingly loose at 491 but it was not causing issues, so I left it at that for now but is something you might want to keep your eyes on.
Even though explained a bit, you will notice throughout the screenshots, many of the values were changed, tCL, tRCD/tRP, tRAS, tFAW, tCMD, tWR, tRFC which are memory timing, then also DIMM Voltages and Frequency (speed of the RAM). As the speeds were raised, many of the values have to be tighter so they would not fluctuate causing instabilities and each was tested thoroughly not only in benchmarks, but in games as well, video rendering and day to day activities, each was solid.
As mentioned above, I have to raise voltages of the RAM in order to support higher speeds. Be careful when raising voltages though as they are tied to the CPU as well. The CPU has the memory controller built into it so raising this voltage will cause the CPU to get hotter, so make sure you monitor the CPU temperature.
Please remember, just because I am using this memory and have achieved these speeds, it does not mean you will be able to. You might be able to achieve higher frequencies with looser or tighter timings, more or less voltage and a range of different settings, not every batch of memory is the same, please keep this in mind.
With all that said, let’s get to the benchmarks.
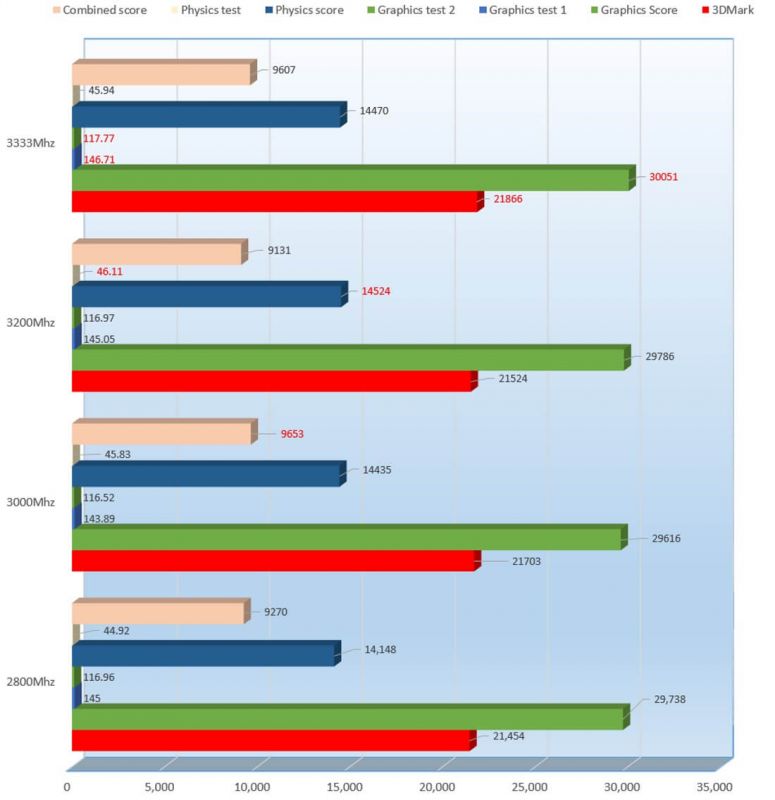
Here we can see all 4 speeds compared, as you might have though, 3333Mhz performed the best on the 3DMark score, but going a bit deeper, we can see all the scores were not improved. While 3333Mhz rose above the rest in the basic score, it came above the rest as well in the Graphics score, Graphics test 1 and 2, 3200Mhz actually performed best overall in the Physics score and the Physics test but then the crown goes to 3000Mhz in the combined score coming in at 9653.
Performance was split across 3333 for 3DMark score, Graphics Score and both graphics test, 3200Mhz performed best in Physics score and Physics test and 3000Mhz came in best in the combined score. 3333Mhz, while not the best overall, brought in some solid performance. Let’s see what this means to Time Spy.
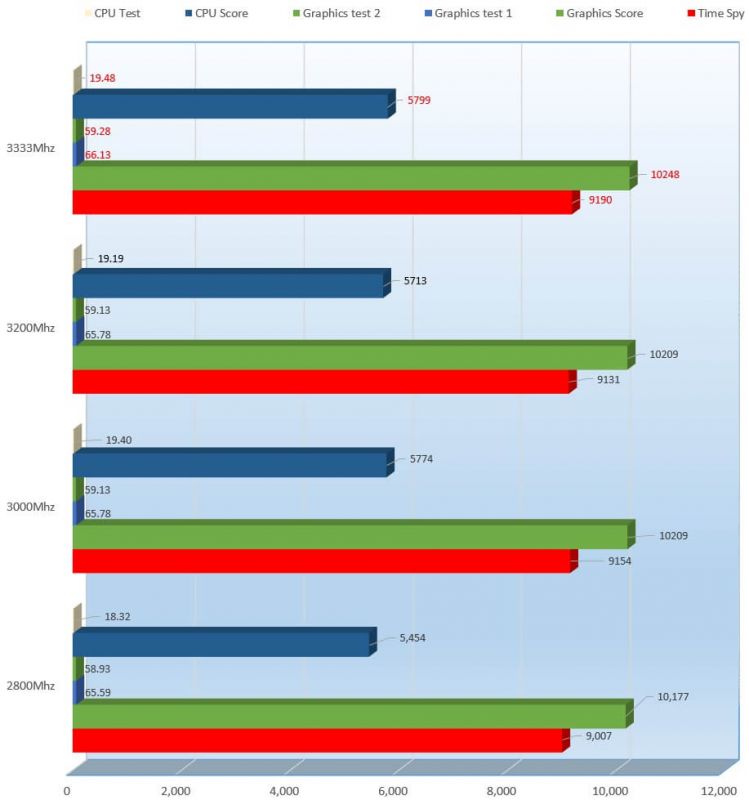
Like you would expect, in this round up 3333Mhz came up on top, with the best performance. A bit odd considering the 3DMark results with a bit varied not so much here.
Both 3DMark and Time Spy are more graphical tests, though memory speed will affect that performance as well, but we need a test that will use memory speeds little more. For starters, we will use PCMark. PCMark, while it does take some graphical performance into its results, it benchmarks the overall system.
PCMark
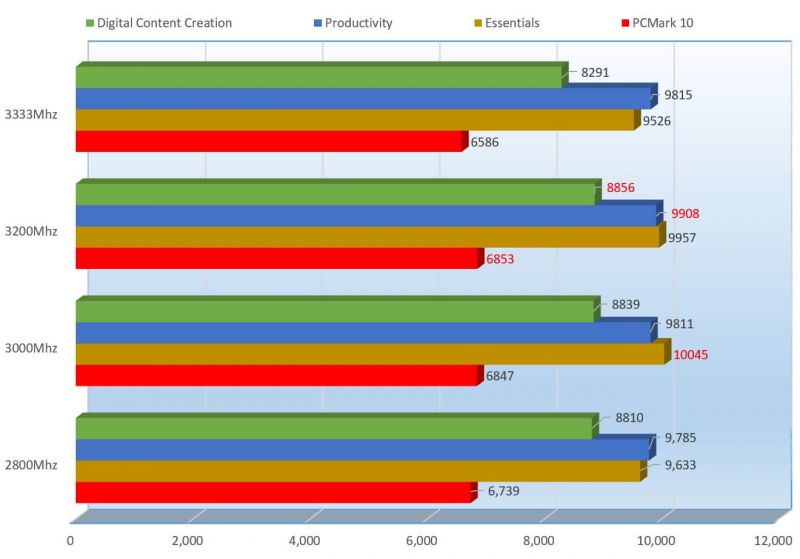
It looks like the scores were scattered here as well, but this time not in favor of the 3333Mhz setting, actually none of the highest scores were part of the 3333Mhz setting. Writing Score, Productivity and PCMark 10 favored 3200Mhz, but the Essentials Score scored highest on the 3000Mhz.
It seems that 3000Mhz, at least in this configuration is best for app Start-ups, Web browsing and video conferencing. The other tests favored 3200Mhz, but curiously they ignored 3333Mhz, the timings were tighter in some aspects which usually means better performance but not in this case. The tighter timings on the 3333Mhz were required to get the machine to work at all at these overclocked speeds.
7-Zip Benchmark
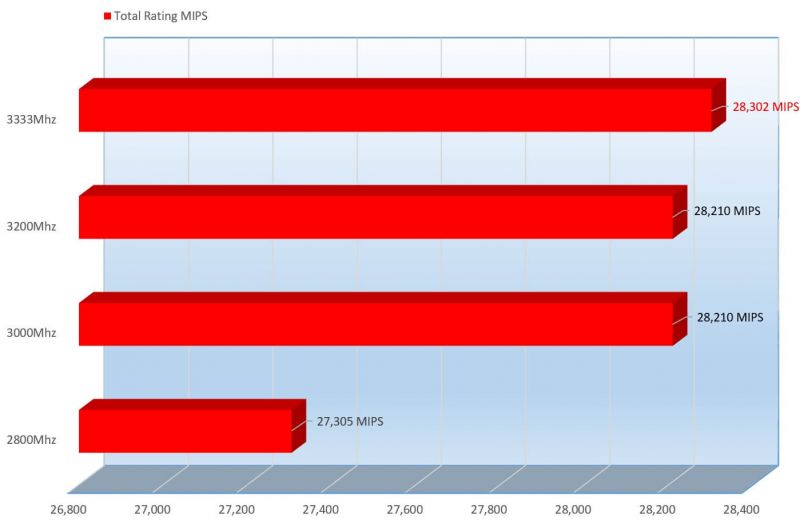
While PCMark focused more on overall system performance, 7Zip, a compression programs focuses on CPU calculations for Decompression but mainly on RAM latency for Compression. 7Zip shows that it favored 3333Mhz, not by a ton but a win is a win and performance is king. For those of us that use compression program other than windows own compress, we know 7Zip to be a great compression program, not so much a benchmark, so let see what AIDA64 says about the performance, a better-known benchmarking software suite.
AIDA64

3333Mhz did a great job here, coming up on top in the Write and Read speeds, but fell slightly short on the Copy speeds which is a bit disappointing. Now the great part is the latency was 2.1 nano seconds shorter than the rest which is great, no one wants to wait a long time.
With AIDA64 complete, another well-known suite for overall system benchmarking also allowing you to focus on specific part of the system is Sisoft Sandra. Let’s see what Sandra says.
Sisoft Sandra
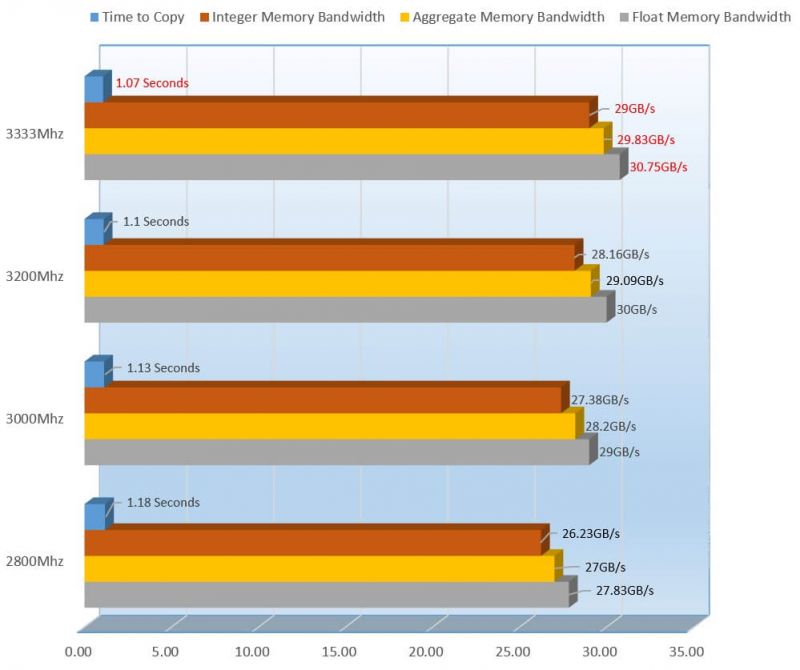
3333Mhz, across the board beat out the lower frequencies, not by a ton over 3200Mhz but you can see it still did overcome it. Always great to see something you worked on hard pay off.
So let’s move on to the final portion, what I though of the RAM.
Memory, it’s one of the most important parts of a PC. Too little RAM and your PC is chugging horribly and you can’t open too many programs or you will end up using tons a lot of paging memory and then if you have a mechanical drive and depending on the paging file, it will make your PC even slower. Too much ram… well you won’t have too many issues unless you have the page file turned on, then it will take up lots of space on your hard drive and increase Read/Writes on that drive which can lower performance a bit if you are on an SSD and lower performance dramatically on a mechanical drive.
The frequency here is a bit low, but if you buy this you already know the frequency is low and Patriot does provide a wide array of capacities, frequencies and timings so you are not limited just to this one, but even this one is not bad. I have shown you here how to overclock it to 3333Mhz, and you can go higher which will save you money because higher frequency RAM costs more, so it may be something to think about. So let’s check out the Pros and Cons.
Pros
- Low heat spreaders, means it can fit just about anywhere
- Lifetime warranty
- Low voltage
- Very high capacity
- Great price for offering
Cons
32Gigs might sound like a lot of memory for a lot of people but gaming, for example in Player Unknown Battlegrounds, with a few Chrome pages open, you see can take 21.2GB of memory.
Running a Wondershare Filmora rendering session of my videos, as you saw before, can draw a lot of memory and of course the more media centric work you do, the more memory it will consume.
So having a lot of memory is great, but not everyone needs it and that of course is perfectly fine. You might want to monitor your memory usage and find out if you are running at the edge, and if so, this might be the perfect option for you.
I found no issues with this RAM, runs great, low voltage requirements, lifetime warranty a great price offering comparing with other brands and the low heatspreaders, you can’t beat it. With that, I give Patriot 32Gig 2800MHz DDR4 PVE432G280C6KGY memory kit an Editor’s Choice Award.

Great job Patriot.
We are influencers and brand affiliates. This post contains affiliate links, most which go to Amazon and are Geo-Affiliate links to nearest Amazon store.
I have spent many years in the PC boutique name space as Product Development Engineer for Alienware and later Dell through Alienware’s acquisition and finally Velocity Micro. During these years I spent my time developing new configurations, products and technologies with companies such as AMD, Asus, Intel, Microsoft, NVIDIA and more. The Arts, Gaming, New & Old technologies drive my interests and passion. Now as my day job, I am an IT Manager but doing reviews on my time and my dime.