
We are influencers and brand affiliates. This post contains affiliate links, most which go to Amazon and are Geo-Affiliate links to nearest Amazon store.
Review of the XFX Radeon RX 5600 XT Thicc II Pro
A bright shiny new video card is what all gamers, graphic and video designers want to help boost their skills. With that boost comes a pretty hefty price tag that not all of us can afford. We do have options but we all want the best! What if I told you that you could still get a great experience without breaking the bank? My review of the XFX Radeon RX 5600 XT Thicc II Pro could be that card to get you to the next level without emptying your wallet.
Let’s see the features and specifications of this investment.
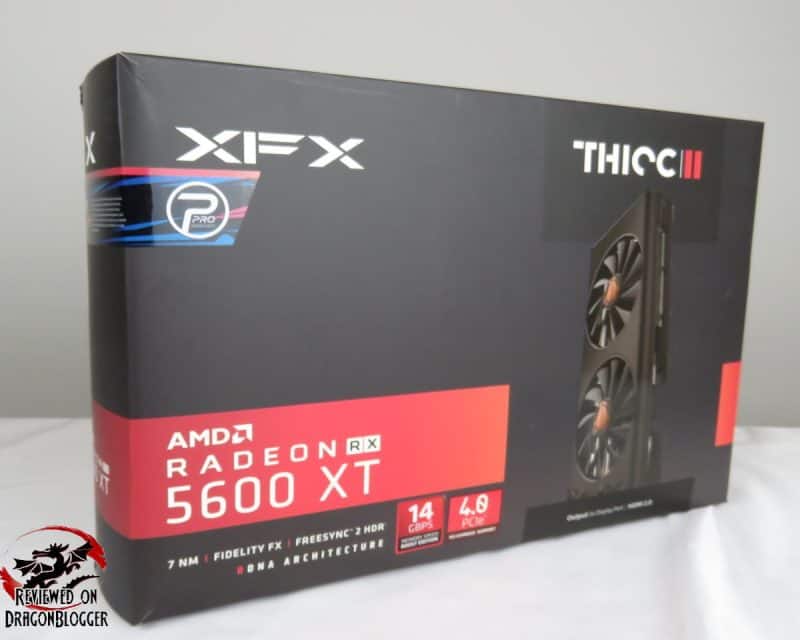
• Based off of AMD’s 2nd Gen 7nm process RDNA architecture
• Boost Clock of Up to 1620Mhz
• 1560Mhz Game Clock
• 6Gigs of 192Bit GDDR6 RAM
• 14 Gbps Effective Memory clock speed
• 2,304 Stream processors
• Dual UEFI BIOS Support
• Dual Fans
• Card Profile: Dual slot
• Dimension: 11.02 x 5.83 x 1.73 inches
• 1 x HDMI 2.0b
• HDMI @ 4096×2160
• 3 x Display Port 1.4 HDR DSC 1.2a
• DisplayPort @ 5120×2880
• Max of 4 concurrent displays
• Supported Features
• Video Streaming up to 8K
• PCI Express 4.0
• Radeon Boost
• AMD Compute
• BIOS Switch
• Asynchronous Compute
• Radeon Rays Audio + True Audio Next
• Radeon Image Sharpening
• Fidelity FX
• Radeon Freesync 2 HDR
• Radeon VR Ready Premium
• Radeon Boost
• Fuse Protection
• DirectX 12 Optimized
• HDR Ready
• Radeon Relive
• XFX Zero DB Auto Load Sensing Fans
• Requires a minimum of 500Watts
• Requires 1 x 8-Pin PCI Connectors
• XFX 3 Year Warranty
You might have noticed, I bolded the 14Gbps portion of the memory clock speeds and it was for a reason. It’s the updated version of the Thicc II Pro with faster memory (14Gbps over 12Gbps). You don’t need to jump through hoops to get that extra speed, you get 14Gbps out of the box. Because of that bump though, an issue does come up. It might be a small one, but we will go over it here.
Talking about the box, let’s see what’s inside.
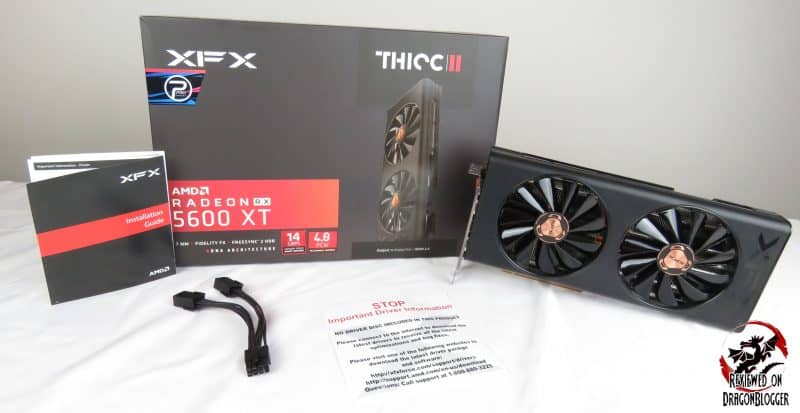
Let’s break it down.
Starting off with the Installation Guide, this will give you the basics on how to install the card. You don’t really need to worry about this document though this since I will go over it in detail here. Stay tuned for that, but let’s move on.

Next up, the driver insert documentation. Some companies will throw a disk in the box with the driver. The problem with that is the minute those CD’s are printed the drivers are out of date. XFX provides you a link to their website which includes their latest approved AMD drivers. It’s a good and a bad thing though.
Good because they don’t want you to have an older driver, they want you to have the latest and greatest. Bad, because sometimes you just can’t download that driver, maybe your internet is out or you have a metered connection. At least Windows 10 will give you basic drivers to get you going in the meantime.
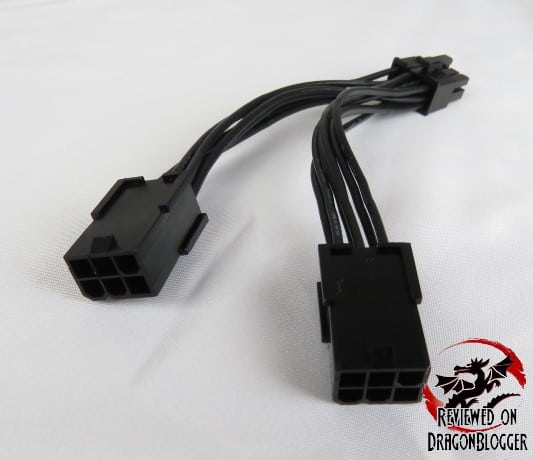
I love the fact that they include this adapter. This adapter turns 2 x 6Pin PCI-e cables into 1 x 8Pin PCI-e cable. The card requires a 450Watt power supply, some power supplies may not include an 8Pin, this has you covered.
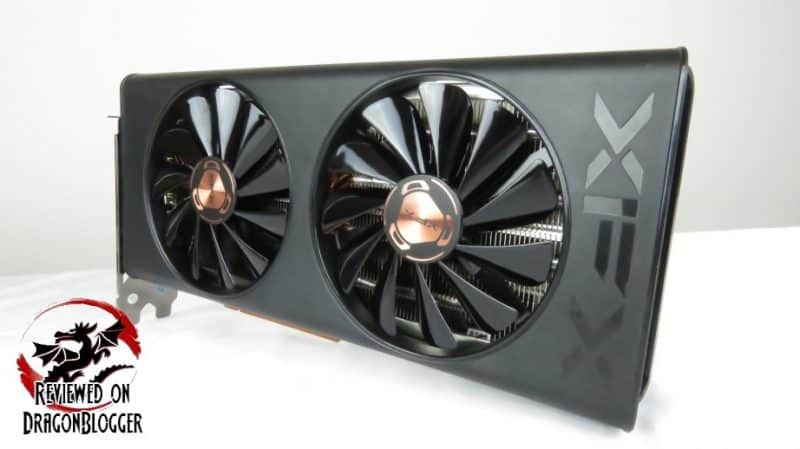
And lastly, but certainly not least, we have the XFX Radeon RX 5600 XT Thicc II Pro itself. I want to get a little personal with it, so let’s take a Close look at the card.
Continue To: A Close Look at the Card
[nextpage title=”A Close Look at the card”]
Getting a little closer

A slick looking card with the XFX logo recessed and smoothed out into the end of the card. Both fans centered with the XFX logo bronzing.

A closer look at the bronzed center of the fan.

The card measures 11.02 inches in length, or 28 cm, the measurement includes that I/O end.

5.83 inches wide, or 49 cm.

And is 1.73 inches thick, 35.5 cm. Nothing out of this world really.

They carved out XFX and used that as a grill, a nice touch, not just a plane I/O. Oh yeah, the card comes with 3 x Display Ports and 1 x HDMI port. The Display Ports are 1.4 with HDR DSC 1.2a and the HDMI port is 2.0b.

Laying the card down, we can see along the sides exposing the fins, the 8Pin PCIe connection, copper pipes and if you get a little closer you see some more details.

We can see right next to the PCIe connection, there is a switch. Switched Left is low power/low noise and switched right is for performance. For the remainder of the review, we test switched to the right for Performance, though the picture here shows on left.

Coming along the back of the card, it kind of looks a little like a spaceship. Sexy strict curves to make it aerodynamic and 4 thrusters propelling the card. The thrusters of course being the copper pipes ending but they are not just sandwiched together with a sloppy seal, they are rounded off and polished. The little cable along the right does mess up the look a little, but it’s gotta be there.

Along the bottom side of the card, where the PCIe connector meets with the PCIe slot, there’s not much going on.

The top of the card, exposes the metal backplate with some slits to help vent the heat out a little. Once again, XFX branding the metal with their polished recessed logo.
Around the edges of the card, there are 4 openings exposing the card but looking good with the rounded sides. The rear, as I showed you before that houses the copper pipe endings almost looks as if it were designed to be a blower card, but it’s not a blower card.

Finally, we have the card inside of the system. This is more of a budget card, so there are no LED’s other than that one blue LED right above the PCIe connection. This brings us to the next chapter in this review Installing the XFX Radeon RX 5600 XT Thicc II Pro.
Continue To: Installing the XFX Radeon RX 5600 XT Thicc II Pro
[nextpage title=”Installing the XFX Radeon RX 5600 XT Thicc II Pro”]
Installing the XFX Radeon RX 5600 XT Thicc II Pro

The card didn’t get itself in there and install the drivers all by itself, we had to take care of that. In this next video, geared more for those of us that don’t know how to install a card, that might be a little terrified installing the card on their own. I try to help everyone in this, if you are a little more advanced you might learn something too, check it out.
In this video, I show you how to remove your old card and install your new card. If you are just looking on how to install the card if you don’t already have a card, this will help you too.
Installing the physical card is only part of it, in the video I also show you how to remove your old drivers and install the latest and greatest AMD has to offer.
Moving along, on this next page we will go over benchmarking, performance, thermals and power consumption. Stay tuned, I have a little something I haven’t done before here coming up.
Continue To: Benchmarking, performance, thermals and power consumption
[nextpage title=”Benchmarking, performance, thermals and power consumption”]
Benchmarking, performance, thermals and power consumption
As you saw in the installation video, the card had to be installed in a system to be used, so let’s go over the specs in my system.
A video card does not work on its own, aside from drivers and all, we need the rest of the system. So that you know what I am working with and to compare performance with your own system, here are my system specifications.
- Windows 10 Professional: https://geni.us/TbOpq
- Asus ROG Strix XG438Q 43” Monitor: https://geni.us/xaNu
- XFX RX 5600 XT Thicc II PRO 6GB: https://geni.us/3G5kk
- Montech Air 900 ARGB White Mid-Tower PC Case: https://geni.us/kcq3
- Alienware Wireless Gaming Headset – AW988: https://geni.us/z52uzC
- Arctic Liquid Freezer II 360: https://geni.us/iAqV
- Intel Core i9 9900K Processor: https://geni.us/0PrCbaY
- Patriot Viper Gaming RGB DDR4 DRAM 3200MHz 16GB Kit: https://geni.us/URlI8
- EVGA Z390 Dark Motherboard: https://geni.us/UmV6t
- WD Black SN750 1TB: https://geni.us/8sqXFs
- Samsung 850 EVO 500GB SSD: https://geni.us/QTA2
- WD Black PCI-e NVMe 512GB SSD: https://geni.us/mMNLde
- EVGA SuperNOVA 1000 G+, 80 Plus Gold 1000W: https://geni.us/IVoE

A quick GPU-Z reading here so you can see what this card has to offer. You might be a little confused here since it looks like a slight bump down from a 5500 XT, and a huge bump down from a 5700 XT, but it’s actually perfect in the middle where it is. Offering double to pixel fill rate and 1.5 times the Texture Fillrate and Bandwidth above the 5500 and less than half that of the 5700,… it’s a confusing tweener.
There will be more comparison further down in the review, but not what you are expecting, so stay tune.
For all of these tests I will do below, I use GPU-Z to gather temperatures of the card and I use a Kill A Watt for reporting the power consumed. GPU-Z is a free and awesome utility but the Kill A Watt you would need to buy, you can click on this link to check it out on my amazon affiliate link, but it is very handy.
For this card, I use GPU-Z not only to capture the GPU temperate but to also capture the HotSpot temperature so that you know both.

I again have changed up some of the games I use to benchmark to go along with what we are playing our there. Below are the list of games and benchmarks I use in this review.
- FutureMark’s 3DMark Fire Strike
- FutureMark’s TimeSpy
- Metro Exodus
- Assassin’s Creed Odyssey
- Shadows of the Tomb Raider
- Far Cry 5
- Tom Clancy’s Ghost Recon Breakpoint
OK, enough with the talk, let’s get started with the benchmarks.

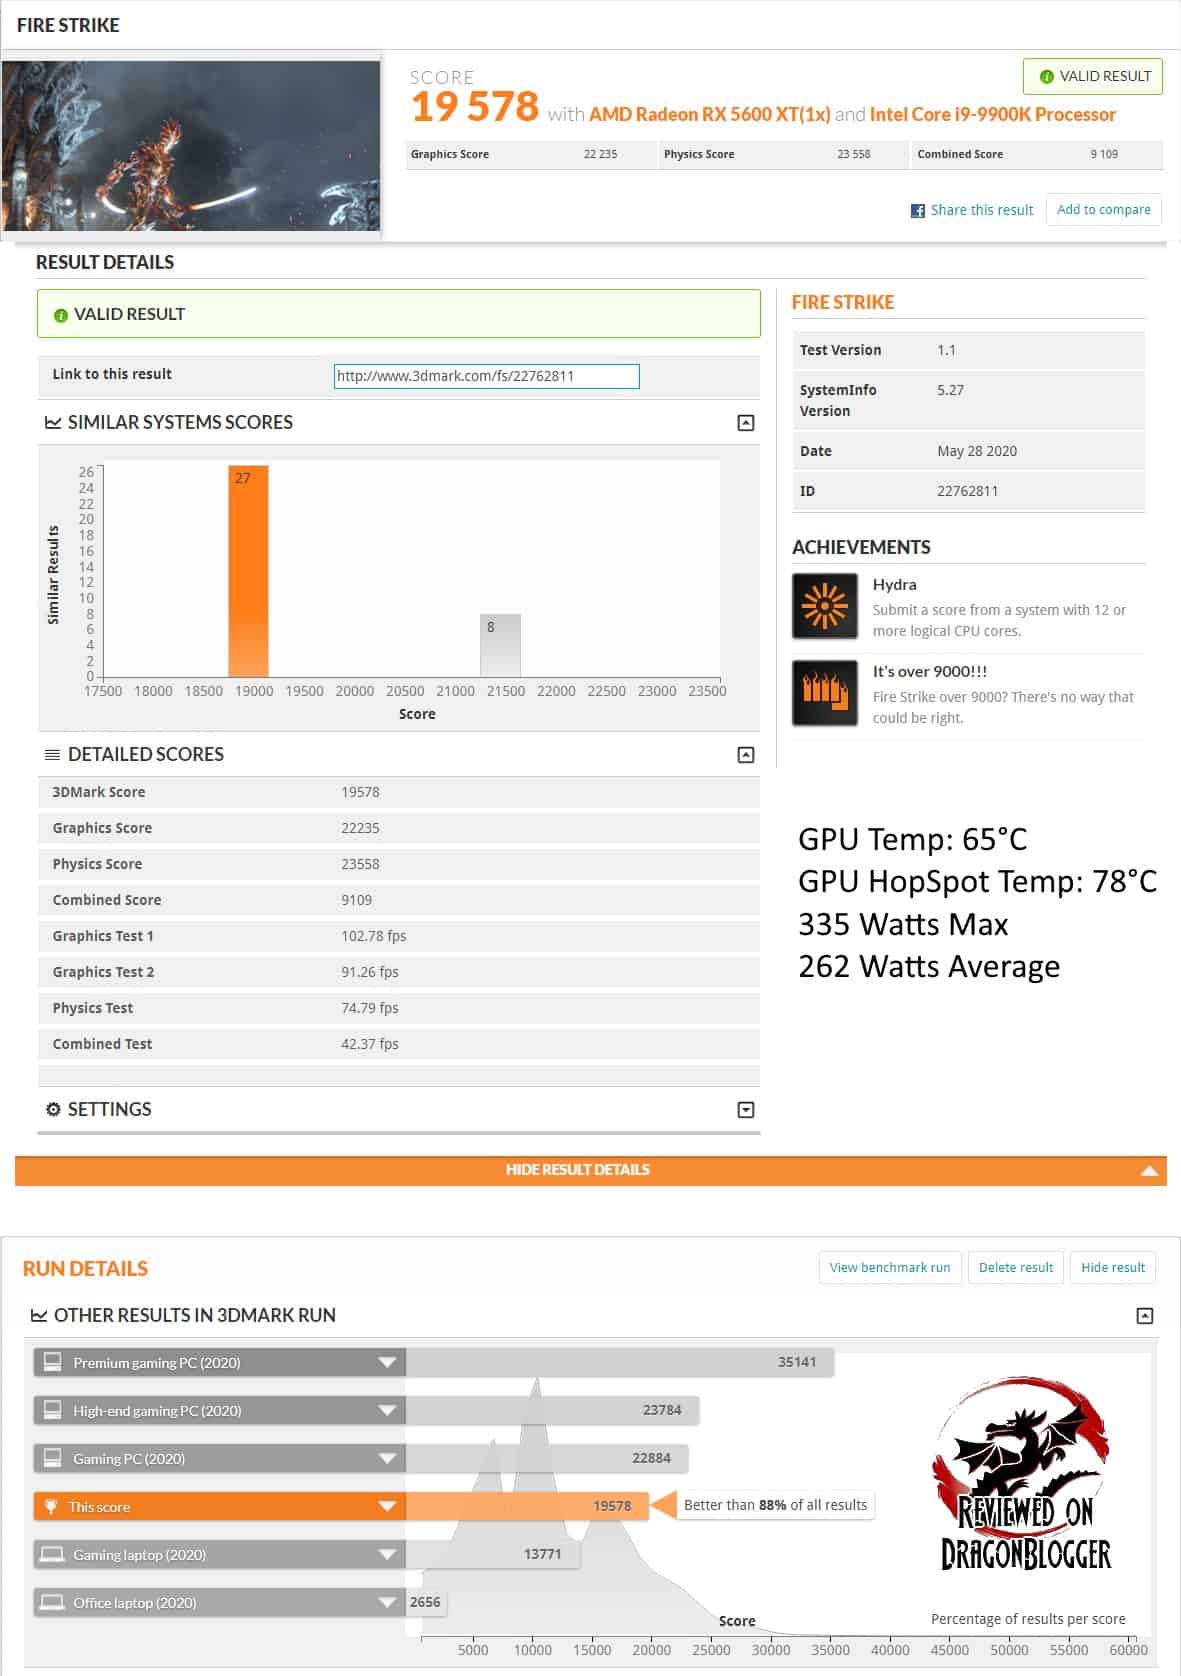
So if you saw my last review on the 5500 XT, you can see this blew it out of the water, not only in performance but cooling as well and for not much more money. The average power consumed was a little higher, but it is to be expect since it performs better. The hottest the GPU got was 65°C and the Hotspot 78°C. The hotspot is a bit hotter than the GPU temperature but it’s got plenty of room to get hotter if need be. The maximum safe operating junction temperature is 110°C, not that we want to be near that, it is worth noting.
The “GPU Hotspot” readout in GPU-Z is reflective of the junction temperature. The “Hot Spot” reflects the Edge temperature of the die. Older graphics cards that feature a single temperature sensor report this ‘edge’ value shown in GPU-Z. However, AMD continues to allow applications to read and publish this legacy ‘edge temperature’ to provide a fair comparison point vs. older Radeon and competitive GPU’s that don’t have the ability to report (and act on) the Junction or Hotspot temperature.
The card requires a 450Watt power supply and it did get kind of close. The XFX Radeon 5600 Thicc II Pro scored 88% better than all of the results, which is pretty awesome for such an affordable card, but that is just one benchmark. Let’s see how it fares on DX12 with UL’s TimeSpy.

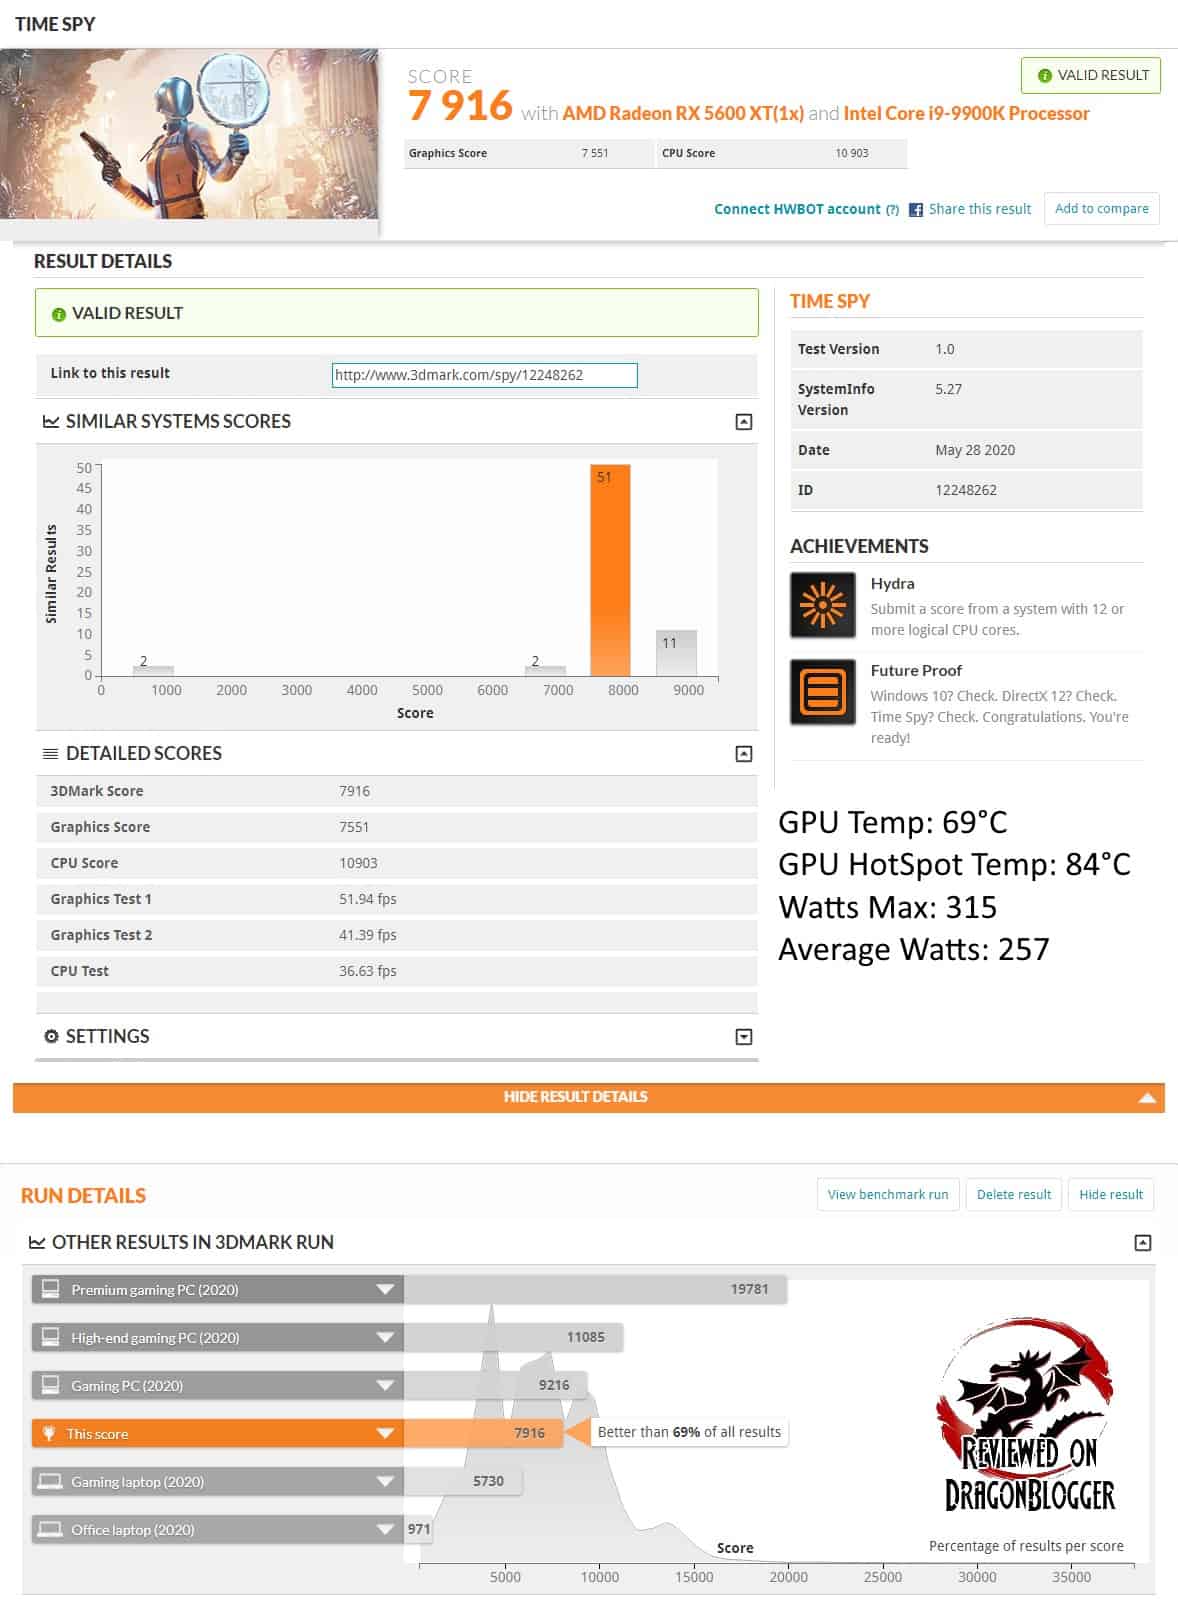
Interestingly enough, this one did come in a bit lower than I expect, 7,916 on the overall score but it did come out 69% above all other results. During this test, the hottest the GPU Temperature was 69°C and the Hotspot was 84°C. While it still was oddly enough lower, it did come in at 69% better than all other results. Here TimeSpy maxed out at consuming 315 Watts and on average 257 Watts.
While the TimeSpy score being lower than expected, I did run them 3 different times, choosing each time the middle score between the 3. This is to make sure that each result is not a fluke and between then 3, there is very little difference. The testing methodology is the same throughout the review so that you get a better feel for each result.
Ok, that’s enough with the synthetics, let’s try some games.

Throughout the benchmarks, I keep the settings the same, only changing the resolutions and presets. Some games though, I chose the Very High, High and Medium presets. Some games change the wording a little like Metro Exodus that calls the Very High Ultra. The resolutions I use are 3840×2160, 2560×1440 and 1920×1080.
The testing on this and future benchmarks is different as before I would only test Very High (Ultra) and the 3 different presets’, but I feel like this did not give a real-world result at comfortable gameplay. Like you, when I can’t play a game, I lower the presets coming down from the highest. I work my way down to a playable result so these results will help you more. Of course, this takes me longer, but this isn’t for me, this is for you. Let’s move on.

Here are the results utilizing the presets and resolutions I mention earlier. Click on the results for a better view of the scores.

At 2160 it was basically unplayable, on 120hz it was smooth but no where near the magical 60fps. We start get more playable at 1440p within the Highs coming in at 56.58 FPS while consuming on average 265Watts. On Medium, the card came in 78.24 FPS consuming on average 288 Watts while heating up to 71°C. At 1080p, every single preset was 100% playable coming from 60.16 FPS all the way up to 94.1FPS on Medium. At Medium, the card only consumes 273 Watts on Average and kept itself on a cool 66°C on the GPU and 80°C on the HotSpot.
So, we can see that this card can handle the GPU slayer that is Metro Exodus at 1440p at Medium. While the TimeSpy results had me a little worried, seeing an actual game coming in playable at DX12 at 2560×1440 raises my hopes a little more for it. I am curious to see what it looks like on our next benchmark, Shadows of the Tomb Raider.


Keeping the same presets and resolutions as we did before. Click on the results for a better view of the scores.

Laura brings us some goodies. Once again, 4K was unplayable, a little worse here than before. Starting at 1440p, we receive 64fps on the highest and 80fps on the lowest. Then at 1080P, at 96 frames per second. At 1080p the card consumes 265 Watts on Average at 71°C on GPU and 85°C on the HotSpot. At medium, we received 118 frames per second at 268 Watts on average and 70ׄ°C on the GPU. Laura treated us well here.
Going back in time from here, let’s see how Assassin’s Creed Odyssey, another GPU slayer treats us.


Assassins Creed Odyssey to my surpris, at 2160p and Medium setting was almost totally playable, a great benefit starting to show the different presets. At 1440p though, it was totally playable from the highest setting to the lowest, 62fps/85fps. Then on highest, it consumed on average 281 Watts keeping a warm 70°C GPU and 81°C hotspot. At 1080p, once again totally playable. We see between 82 and 102 fps on the highest settings consuming on average 300 Watts, keeping the temperatures similar to 1440P. This one really surprised me since it pounds on GPU’s and the XFX Radeon RX 5600 XT Thicc II Pro really kept up.
Keeping on with the odd results, let’s see what our crazy friends at Farcry 5 think about this card.

