
We are influencers and brand affiliates. This post contains affiliate links, most which go to Amazon and are Geo-Affiliate links to nearest Amazon store.
CAD, Games, Google Chrome, Audio/Photo/Video Editing and your Operating system all together suck up lots of RAM and while you should control everything you have open, sometimes you need everything open. Sometimes all you can do is get more RAM and that is not a bad thing.
When asking about what to look for in a gaming pc, RAM is one of the best things you can do to improve the performance of your PC or Mac and this is one of the most important things whether you are building your own, upgrading or buying one. Not too long ago though, a newer option has been hitting RAM modules and that’s RGB, and I was for one not incredibly impressed by this but I was open to the idea. With all these options and requirements, you may not know what RAM to select and I will help you.
Today we are reviewing the Patriot Viper Gaming RGB DDR4 3200MHz 16GB Kit PVR416G320C6KW. This might be your next kit, or maybe not but in this review, we will be going through some of the features and performance of this kit. Before we get into the performance, let’s take a look at some of the specifications of the Patriot Viper Gaming RGB DDR4 3200MHz 16GB Kit.
Specifications
- Memory Type: DDR4 SDRAM 288-Pin
- Capacity: 16Gig (2 x 8GB)
- Speed: 3200Mhz
- Base Frequency 2133Mhz
- Tested Frequency 3200Mhz
- Automatic Featured Overclock: XMP 2.0
- Compatibility and performance tested across AMD and Intel Platforms
- CAS Latency: 15
- Base Timings: 15-15-15-36
- Tested Timings 16-18-18-36
- Voltage: 1.35
- 5 Customizable RGB Zones
- Tested across lead motherboard RGB Sync applications for compatibility
- ECC: Non-ECC
- Pin-Out: 288-Pin
- Multi-Channel Kit: Dual Channel Kit
- Buffered/Registered: Unbuffered
- Warranty: Limited Lifetime
- RoHS certified
Now that this is out of the way, let’s get into an unboxing.

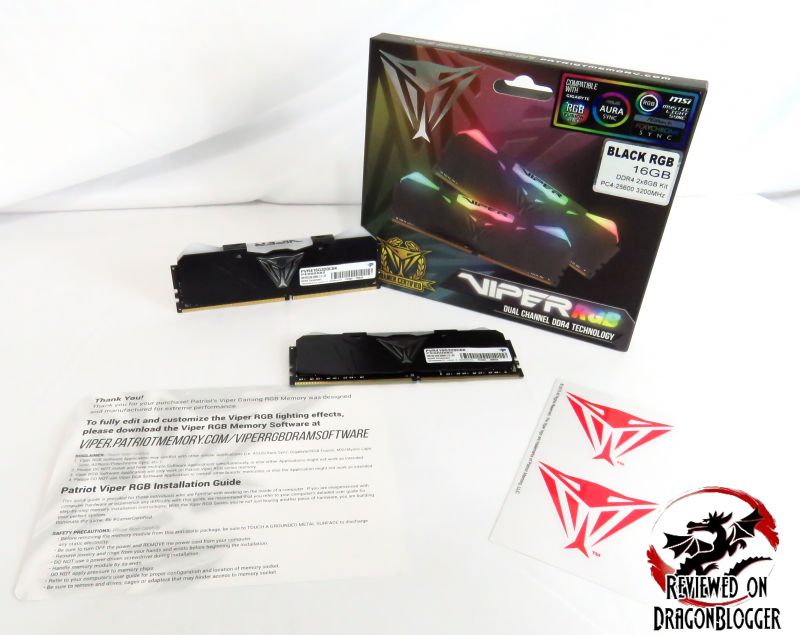
Now for a closer look at everything.
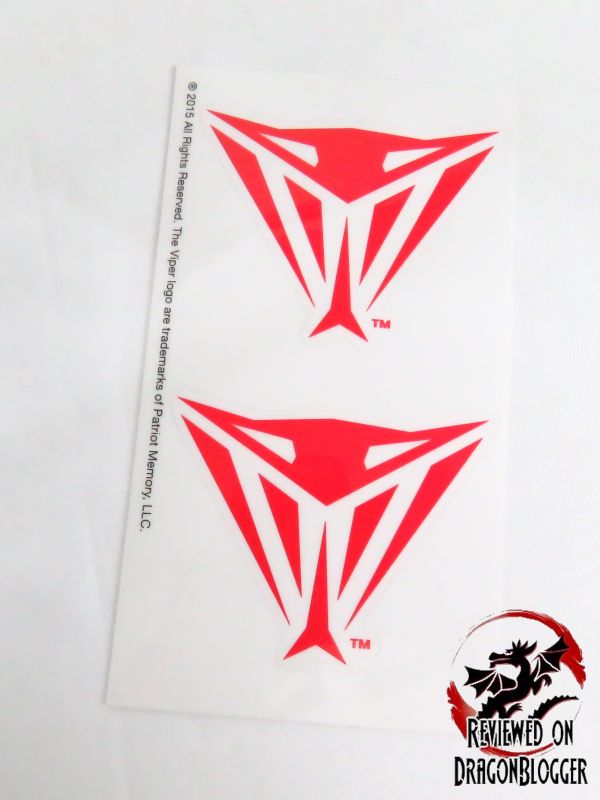
First off, Patriot includes 2 Viper stickers. I like them, but I think they might have been a little better with the Patriot Viper label on them too, what do you think?
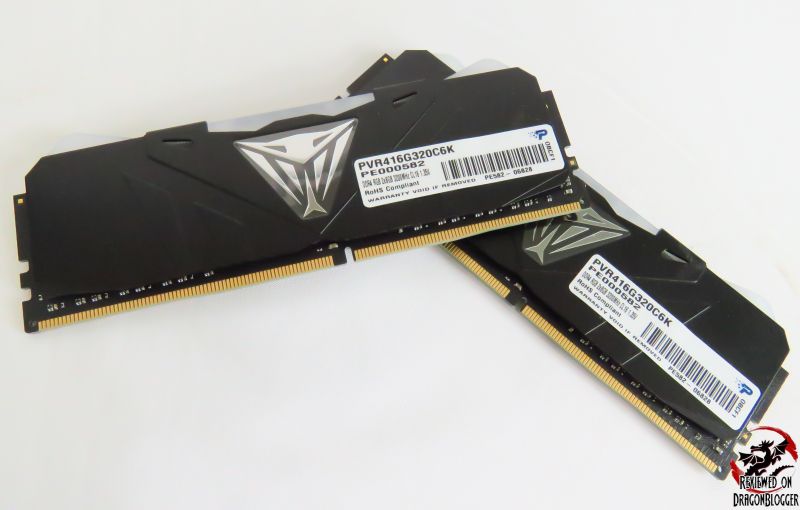
A little closer look at the Patriot Viper Gaming RGB DDR4 3200MHz 16GB modules themselves. Each stick is 3200Mhz at 8Gigs.
This kit being only 2 sticks of RAM allows you to select up to 32gigs. Usually it’s best to buy memory built at the same time to help make sure that they are all using the same IC’s (memory chips) especially when overclocking.
The memory comes with a black heat spreader, with the Viper logo in the middle.
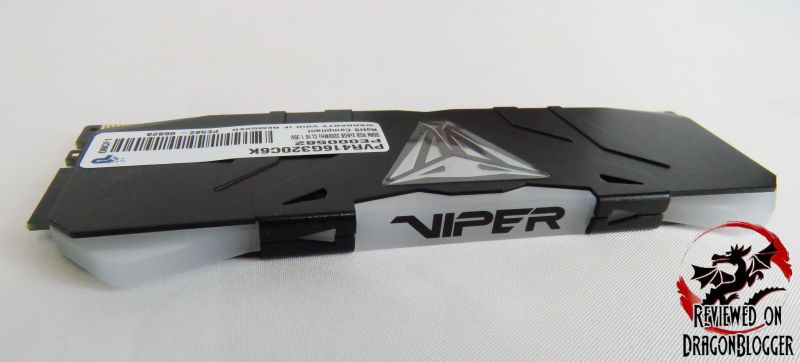
Shown on the initial picture a bit and now shown from the top we can see the white portion that is actually the RGB LED’s. I will go over this a little more later in the review. We can see the center white portion has the brand name VIPER along the top.
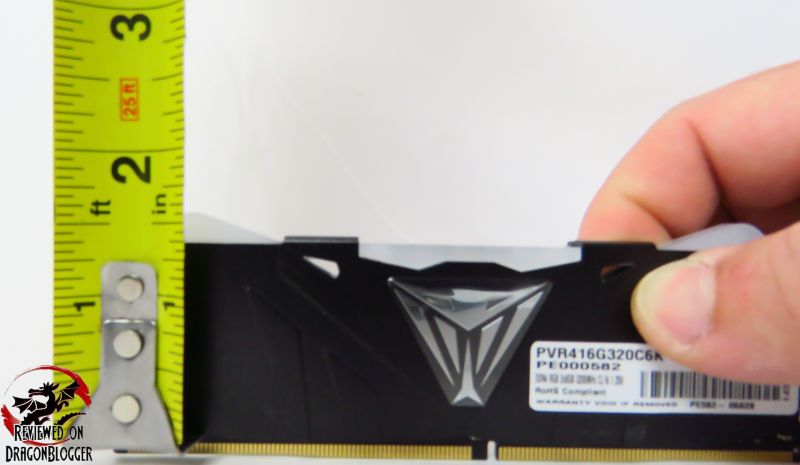
Here we can see that the memory from the heatshield is 1 inch and 9/16th. This is so that you can measure to see if you have space in your system for this RAM. I measured from the start of the heatsink (which usually starts right when you install the RAM) to the very top of the RGB LED. This RAM is actually pretty short, great fit.
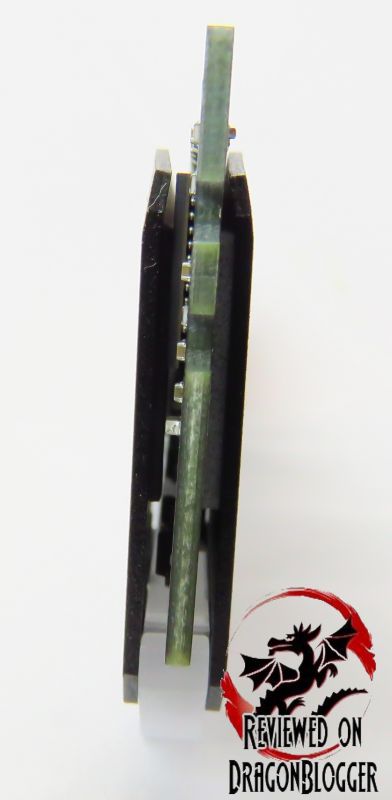
A little tilted to the side as I had the RAM stand itself, you can see how the memory is sandwiched between two pieces of aluminum and sticky pads to keep the heatsink attached to the memory. You can also see how the RGB LED integrates into the RAM.
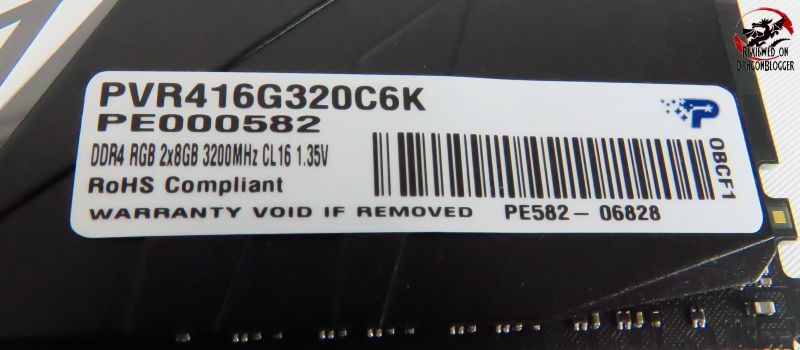
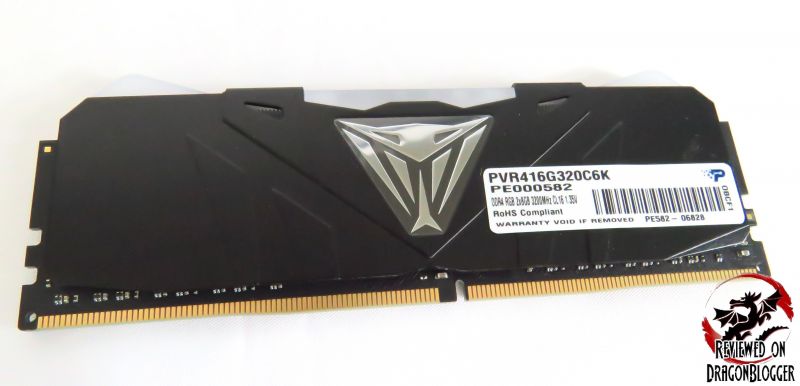
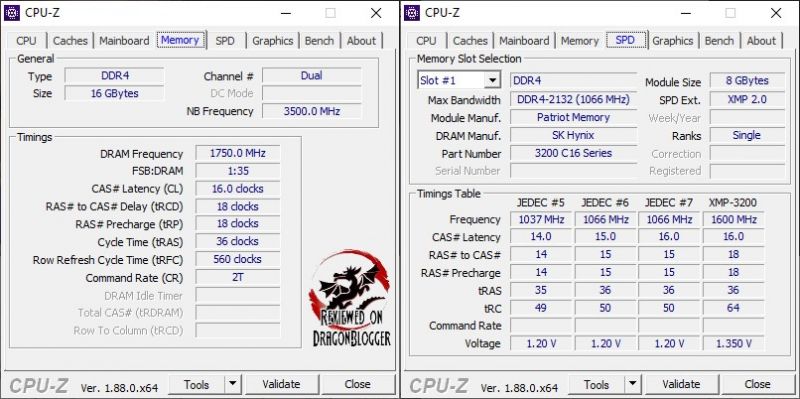
A closer look at the label, we can see the PVR416G320C6K model number. We can also see it showing that it is DDR4 with RGB and the kit contains 2x8GB at 3200MHz at a CL of 16 running at 1.35V. The memory is also RoHS compliant, which means the restriction of hazardous substances.
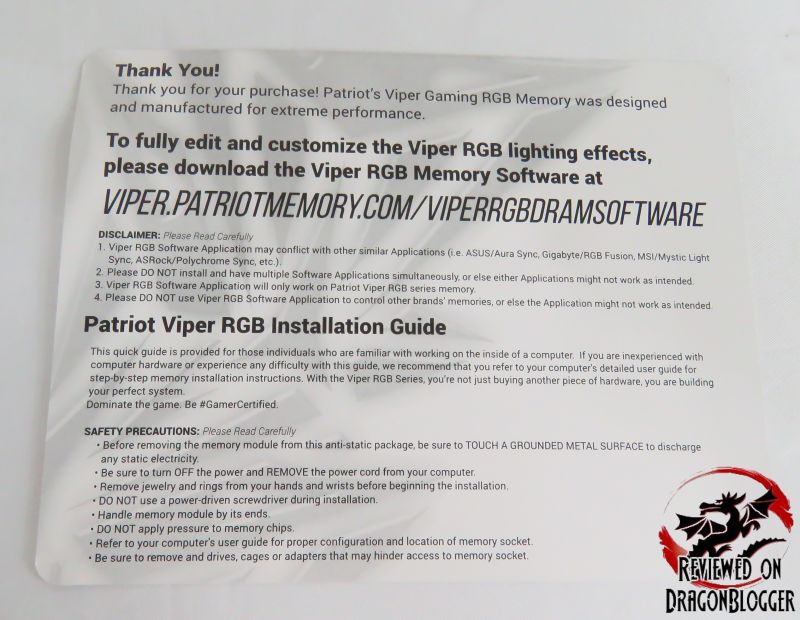
Last but not least, the “Thank you” card. Not only does the card thank you but it shows you where you can download the software used to customize the LED lighting. One word of caution this gives you though it to make sure you do not install this application if you have other pieces of software that control RGB pieces of hardware. In my case, it is not an issue as the EVGA Z390 Dark motherboard does not have any sort of RGB header or application but not to fear as the Patriot Viper RGB software will take care of us.
The instructions go over how to install the RAM, but no worries I will show you how to do it here in this video. So let’s jump into the next section so that we can get a better idea on Installing and configuring.
Continue: Installing and Configuring
[nextpage title=”Installing and Configuring”]
Installing RAM is one of the easiest processes when building a computer, but even still, don’t take it lightly. As easy as it is to install, I personally have known people that have installed RAM the wrong way, reversed it and made it fit. This means he had to force it down with all his might totally ignoring the fact that there is a piece of plastic right in the center of the DIMM slot and a matching notch on the memory, so of course he broke the piece of plastic. Oddly enough the PC would not boot, I wonder why?
All joking aside, don’t feel bad if you don’t know how to install RAM, we all had no clue what we were doing until we learned.
Most boards have a legend on them and if not, the motherboard manual can help you too.
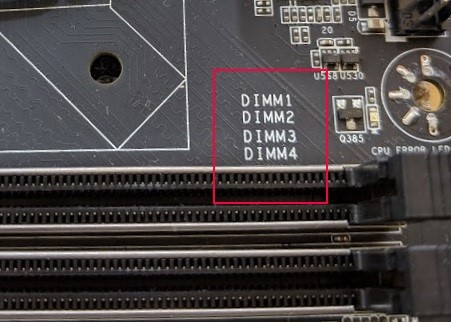
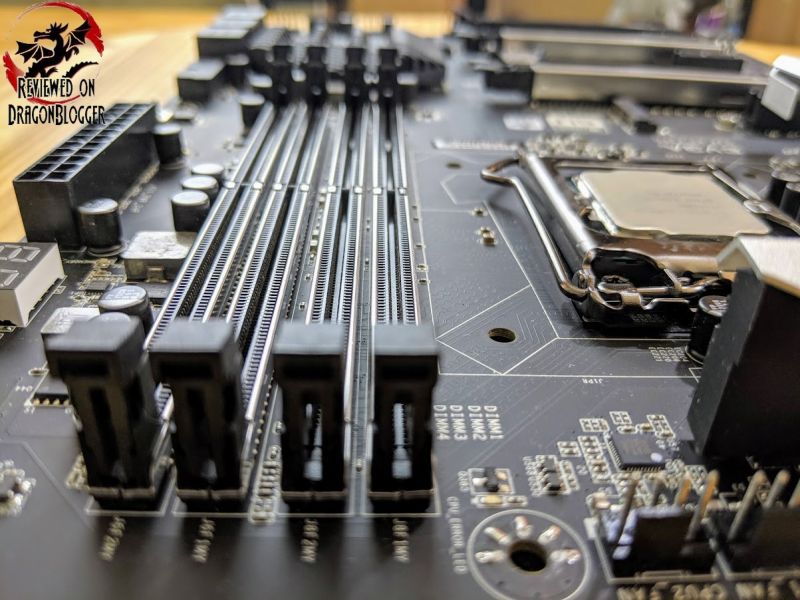
On this board, it is clearly silk screened on the board next to the DIMM slots. While I showed you on the EVGA Z370 FTW motherboard, we will be working with the EVGA Z390 Dark motherboard in this review. I showed you on the Z370 since it has 4 DIMM slots to help you better understand the order the memory should go in, regardless of the video, do consult with your motherboard manual to be sure.
Hopefully, I can show you with this video.
In case you missed it, once in the BIOS, you jump to the Memory section (depending on your board)
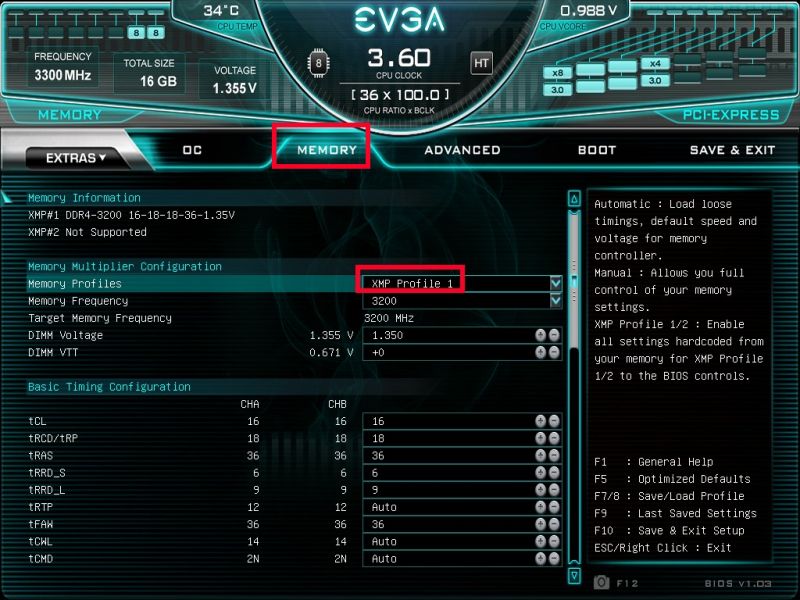
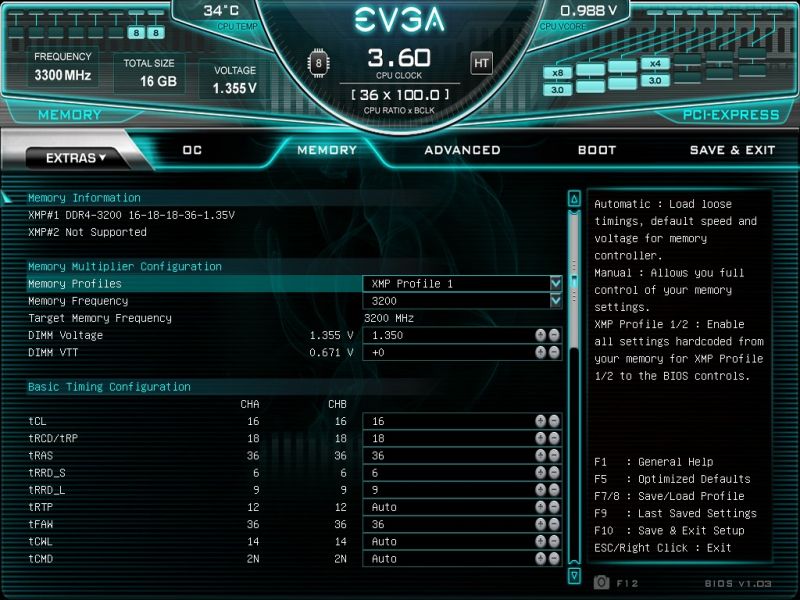
In this section, I change the “Memory Profiles” to “XMP Profile 1”. This automatically sets the Memory Frequency to 3200Mhz, the DIMM Voltage to 1.350V and then changes many of the Timing Configurations settings. I won’t go over the Timing settings since they are set automatically, but they are VERY important because if you set them incorrectly your machine will not boot. On the flip side, lowering some of these timing settings can reduce latency which will improve performance.
Once you have set the XMP 2.0 Profile, you can start using your PC as you regularly do. I am sure you are curious though on how it performs and I will show you a bit later in the review.
If you remember, these are the default settings with XMP Profile enabled which will put us at 3200Mhz. The other overclocks I have set are 3200Mhz, 3400Mhz and 3500Mhz within this review. I will discuss the overclocks and all a little later in this review.
Now that we have the memory installed and configured, we will go over utilizing the RGB on the RAM and then benchmarking. Benchmarking will consist of standard memory clocks as well as overclocking the memory above its already overclocked XMP profile.
Continue: Setting up and controlling the RGB
[nextpage title=”Setting up and controlling the RGB”]
This is a very short section, its just going over how to use the Patriot Viper RGB software, which you can download from here: https://www.viper.patriotmemory.com/viperrgbdram
After installing and running it, you get to this screen.

You can see how it works here.
Pretty simple right, OK, now let’s move onto the Benchmarking.
Continue: Benchmarking
[nextpage title=”Benchmarking”]
Now to the fun part, overclocking and benchmarking. Here are the tools I use for testing to make sure the overclocks are solid.
- 3DMark
- FireStrike, and TimeSpy
- 7Zip
- AIDA64
- CPU-Z
- Sisoft Sandra
Let me explain why I use these pieces of software, please chime in if you would recommend anything different.
- 3DMark: While not a benchmark for memory, it does provide overall system performance. It does of course steer more in the direction for video but memory speeds do play a role in its performance.
- 7Zip: While 7Zip is a tool for file compression and decompression, it also provides a tool to benchmark the speed of your processor and RAM. The Compression speed test relies heavily on your RAM latency, Data cache size and speed and TLB or translation lookaside buffer. The TLB is a memories cache that stores recent translations of virtual memory into physical addresses for faster retrieval of that cache. MIPS stands for millions of instructions per second.
- Decompression relies more on the CPU’s integer operations and very little on memory and its own cache, but it is wrapped in the test. The performance is based off of MIPS (Million Instructions per second. The overall score is calculated from the measured speed of its calculations. I run this test for 100 passes, not only test get a better tested score but also to test system stability under each configuration.
- AIDA64: Is a benchmarking suite that can benchmark the entire system, but I will focus this test only on Memory, since we have a few other suites benchmarking everything. The memory test here benchmark reading, writing with data transfer bandwidth and latency.
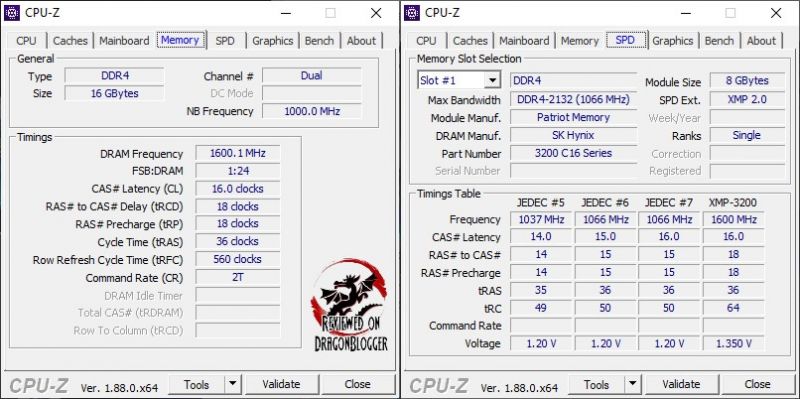
- CPU-Z:Well this is not really a test, but a utility to tell you what speed your CPU, Memory and the likes are running at. This piece of software provides information to confirm what you have done in the BIOS making sure all is well, confirming Bus Speeds, Multipliers, Frequencies, Channel’s and more. Yes, many pieces of software do this as well, but this is 1 of them.
- Sisoft Sandra: Sandra is also a suite that can potentially benchmark the entire system and can also be used for diagnostic purposes, like most if not all of the previous software titles mention. For memory, I will be running Sandra’s Memory Bandwidth and Latency tests.
The other test for stability of all the overclocks here is that this is my main machine, the machine I use daily. Each overclock had days of testing playing gaming, editing videos that you see in this review and tons of other uses, so these are each solid.
As you know, the XMP speed is 3200Mhz, so of course I tested at that speed but I overclocked the memory to 3400Mhz and 3500Mhz as well. I tried to get to 3600Mhz but this one would take a lot more work and since I spent so much time with the other speeds, I would have to skip it for now. The times I tried to reach those speeds the system would not P.O.S.T, but I am sure if I had spent more time, I could have hit it or further.
Before I get in the settings, let me show you my system specs.
- Viotek G35DR 35″: http://geni.us/6LrGJ
- Core i9 9900K Processor: https://geni.us/0PrCbaY
- Fractal Design DEFINE S2 Vision RGB: https://geni.us/t6xXT
- Fractal Design Celsius S36 360mm Liquid Cooling Unit: https://geni.us/m6LvD
- EVGA Z390 Dark Motherboard: https://geni.us/UmV6t
- EVGA Geforce RTX 2080 XC Ultra Video Card: https://geni.us/SwBEU6
- WD Black SN750 1TB: https://geni.us/8sqXFs
- Patriot Viper Gaming RGB DDR4 DRAM 3200MHz 16GB Kit: https://geni.us/URlI8
- Patriot Scorch 256GB NVMe M.2 PCIe M.2 SSD: https://geni.us/fPk1BA
- Samsung 850 EVO 500GB SSD: https://geni.us/QTA2
- WD Black PCI-e NVMe 512GB SSD: https://geni.us/mMNLde
- beQuiet! 1000Watt Power Supply: https://geni.us/jEYLM79
Ok, so let me show you the overclocks and its settings, thankfully most were easy, but I did have to play with voltages a little.
3200Mhz (XMP Profile 1, no modifying)
3400Mhz (XMP Profile 1 bumping Memory Frequency, no modifying). I skipped 3333Mhz.
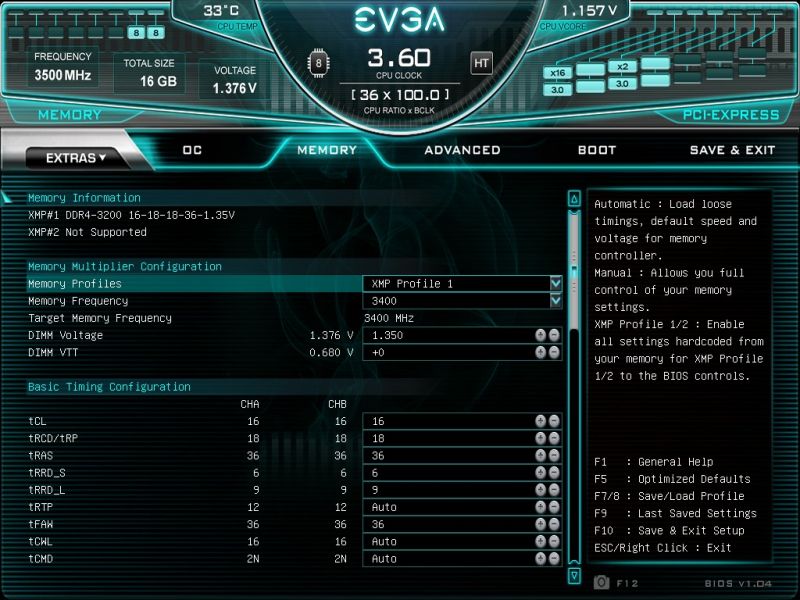
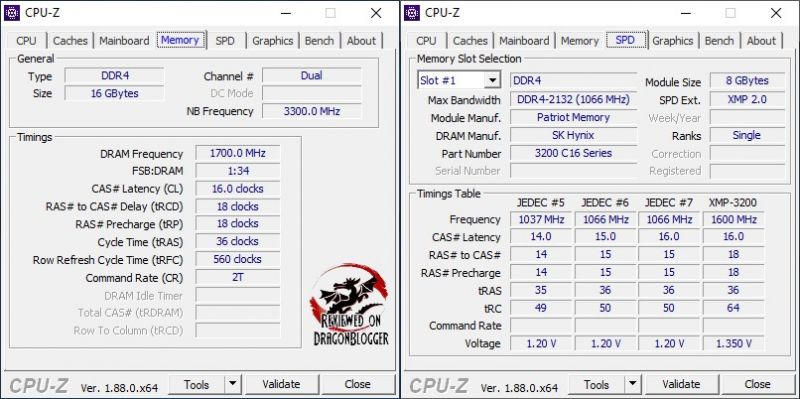
3500Mhz (XMP Profile 1 bumping Memory Frequency, raising Voltage to 1.370V).

Thankfully there was not a lot of fumbling to do here, but lots of testing in between. On the 3500Mhz, it last about a day or 2 with no issues but on the 3rd day, it froze so I had to bump it up to 1.370V and redo all of my testing and usage. Let’s get started with the benchmarking.
3DMark – FireStrike

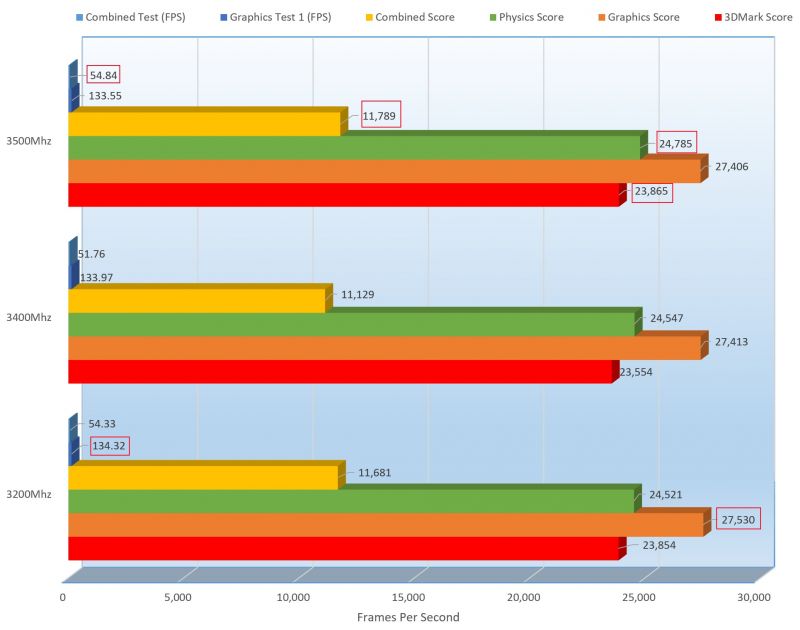
The results here are a bit interesting, I highlighted above the champions of each section. From left to right, we can see the Combined Tests on FPS won on 3500Mhz at 54.84 which was 0.93% faster than the runner up at 3200Mhz. Graphics Test 1, the winner was 3200Mhz coming in at 134.32, 0.26% faster than 3400Mhz at 133.97FPS.
Leaving FPS, under Combined Score we can see 3500Mhz took the cake at 11,789, 0.92% faster than its 3200Mhz counter part coming in at 11,681. On Physics, 3500Mhz again clearly wins at 0.85 faster than 3400Mhz at 24,547. Graphics score was actually won by the stock XMP settings of 3200Mhz, coming in at 27,530. This is 0.43% faster than the runner up 3400Mhz score of 27,413.
Lastly, the score most pay attention to, the overall 3DMark score, 3500Mhz takes the lead coming in at 23,865 which is 0.046% faster than the runner up 3200Mhz at 23,854. Ok, let’s jump to TimeSpy.
3DMark – TimeSpy

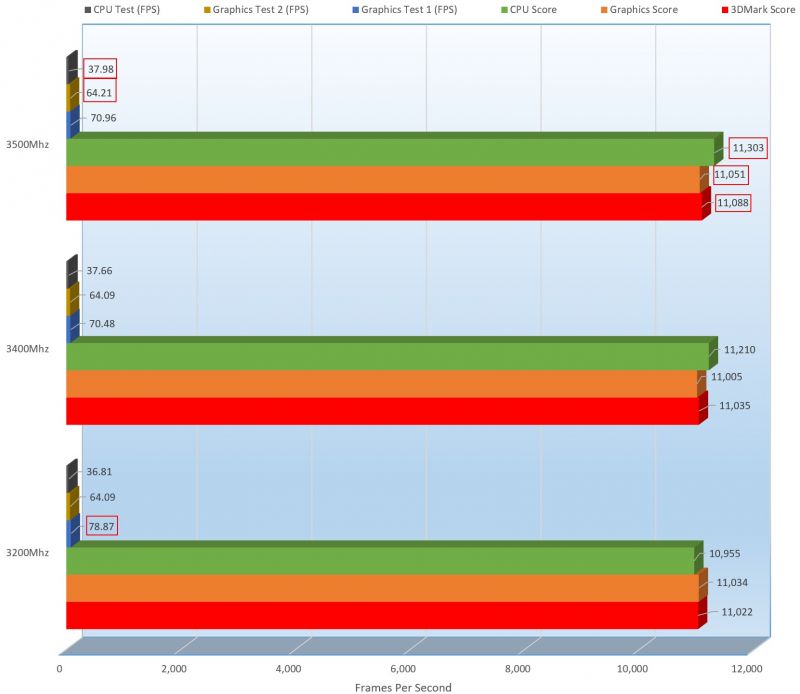
Ok, this one makes a little more sense. Going again from left to right, on CPU Test, we can see 3500Mhz came in the lead at 37.98, 0.85% faster than the runner up 3400Mhz at 37.66. Picking up the Graphics Test 2, 3500Mhz again dominates by the tiniest of leads by 0.187% on both 3400Mhz and 3200Mhz. Graphics test 1 though changes the reigning champion brining it back down to earth by having 3200Mhz take the lead by 10.58%, that’s a pretty decent increase.
Coming out of the FPS side, the CPU score has 3500Mhz taking the lead coming in at 11.303, 0.826% OVER 3400Mhz at 11,210. The Graphics Score on 3500Mhz, comes in at 11,051 taking the lead over 11,034 by 1.58% at 3200Mhz. The more commonly referenced score of 3DMark shows 3500Mhz taking again the lead at 11,088 over 3400Mhz at 11,035 by 0.60%.
While 3500Mhz did dominate many of the benchmarks, we can see that the base XMP did have a lot of pull, coming above in quite a few. 3400Mhz did not fair as well and actually came in below many of the 3200Mhz as well. Graphics though will not take too much advantage of a bump in memory speeds though it wont hurt. 7Zip being more processor and memory intensive will benefit from this, so let’s check it out.
7Zip

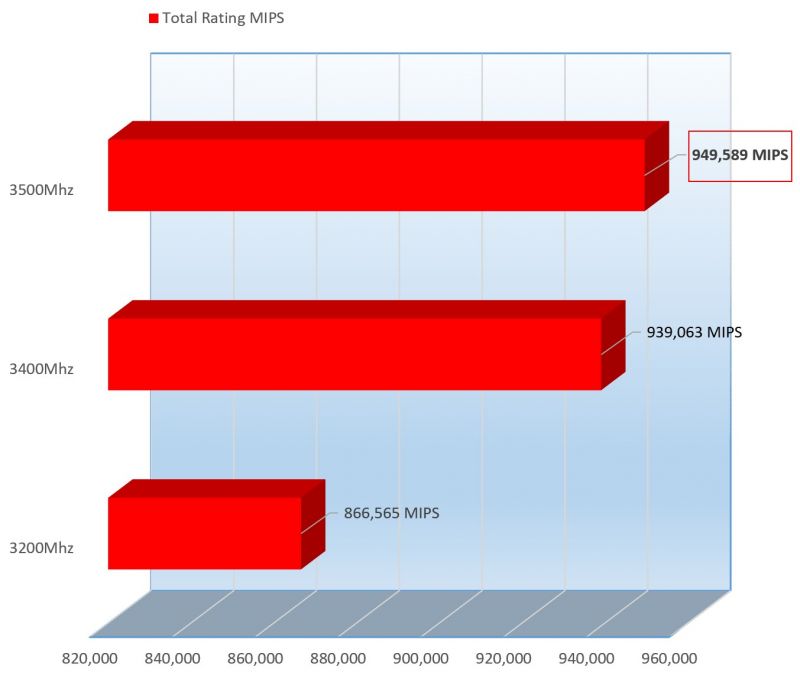
While 3DMark focused more graphical performance, 7Zip, a compression program focuses on CPU calculations for Decompression but mainly on RAM latency for Compression. 7Zip shows that it favored 3500Mhz which of course it not a surprise. 3500Mhz performed 1.11% faster than 3400Mhz and 50.67% faster than its base XMP frequency of 3200Mhz.
We know 7Zip to be a great compression program, though not regularly known to be a benchmark, so let see what AIDA64 says about the performance, a better-known benchmarking software suite.
AIDA64 Cache & Memory Benchmark
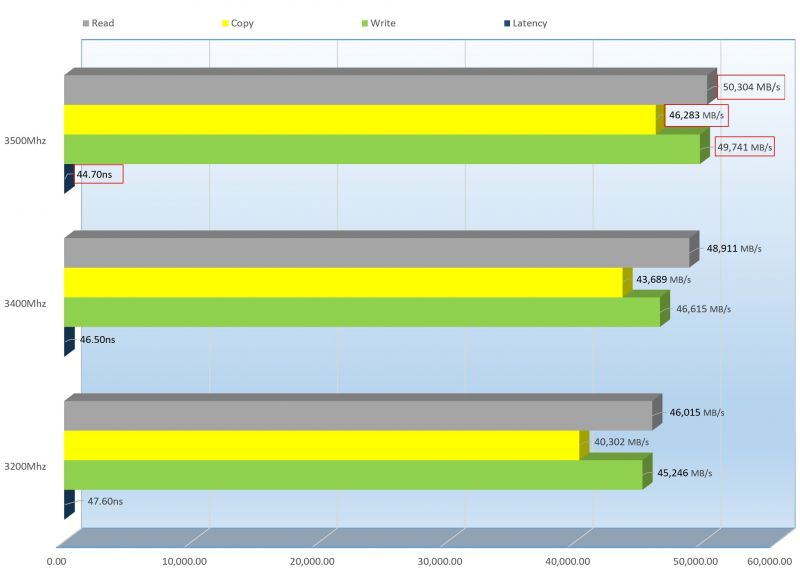
3500Mhz did a great job here, coming up on top in the “Write”, “Read speeds” and “Copy speeds” as you would expect. “Read” came up 2.80% faster, “Copy” 4.48% faster and the “Write” was 5.76% faster, “Latency” was 3.95% lower (Faster) than 3400Mhz, no one wants to wait a long time.
With AIDA64 complete, another well-known suite for overall system benchmarking also allowing you to focus on specific part of the system is SiSoft Sandra. Let’s see what Sandra says.

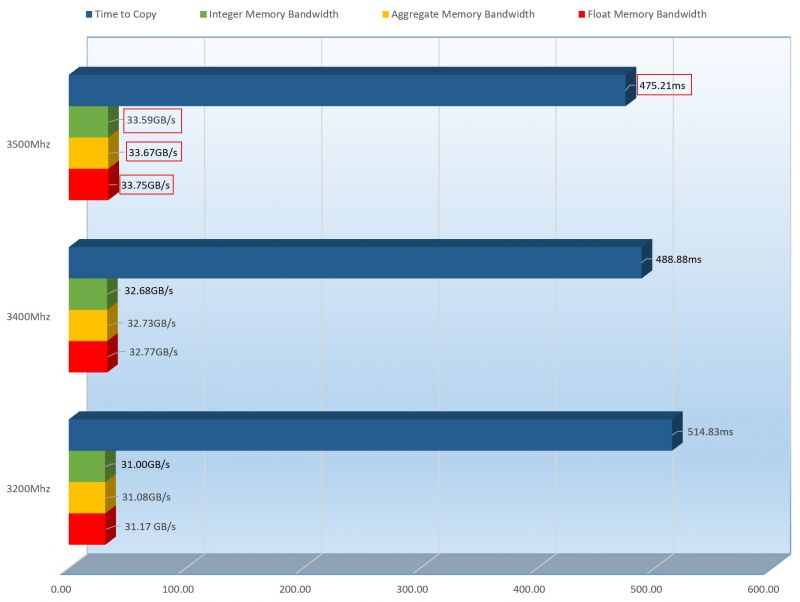
3500Mhz, yet again trumps the rest. On 3500Mhz, “Time To Copy” had a much better time resulting in less time to copy files, 2.84% faster than 3400Mhz. “Integer Memory Bandwidth”, 8.52% faster, “Aggregate Memory Bandwidth” 2.83% faster and “Float Memory Bandwidth” 2.95% faster than 3400Mhz. This is so important because this is your everyday use of your computer, you can see how that increase in speed helps.
OK, now that we are done with the benchmarking and testing, its for my Final Thoughts and Conclusion.
Continue: Final Thoughts and Conclusion
[nextpage title=”Final Thoughts and Conclusion”]
We all want the latest video card, Processor and SSD and many times we forget about upgrading our memory, it’s one of the most important parts of a PC. Too little RAM and your PC is chugging horribly and you can’t open too many programs or you will end up using tons of paging memory making tons of calls on your SSD or Mechanical drive making your PC a bit slower. Too much ram… well you won’t have too many issues unless you have the page file turned on, then it will take up lots of space on your hard drive and increase Read/Writes on that drive which can lower performance a bit if you are on an SSD and lower performance dramatically on a mechanical drive.
The frequency here is not the highest, it is mid-range but the added RGB feature brings it up some. I was not much of an RGB guy until I got this memory and the case in this review, the Fractal Design Define S2 Vision RGB then I made the 2 match, RGB kinda grew on me. Patriot sells these Viper RGB kits all at 16GB capacities but speeds from 2666Mhz up to 4133Mhz either with Black Heatshields or White Heatshields, so you have plenty of options.
I have shown you here how to overclock it to 3600Mhz from 3200Mhz, and you surely can go higher which will save you money because higher frequency RAM costs more.
OK, so let’s jump to the Pro’s and Con’s
Pros
- Lifetime warranty
- Low voltage
- Great price for offering
- RGB
- Even with the hills for the RGB, memory is relatively low profile
- Aggressive and competitive pricing
- Latency is not the lowest, but for the price is equal if not better than the competition
- Decent overclocking headroom
- Compatible with Intel and AMD
- Simple and effective RGB Software
- Multi-zone RGB LED and variable lighting options
Cons
- Latency is not the lowest, but for the price is equal if not better than the competition
- Modules start off in sync, but after a few minutes they run out of sync
If you would like the review condensed, in a video, you can also find it all here
I was grasping at straws to find cons honestly. The Latency is not the tightest, but of course you can adjust the timings, but you need to test lots to make sure the timings are solid.
It does not bother me too much, but some are a bit more picky on the lighting aspects. The LED’s start off in sync but after a few minutes, they change a bit. This is a bit of an over site I think which makes the overall score a little lower, but being that everything else functions properly, I would have to not take off much. So let’s see the final score.
[P_REVIEW post_id=1085412 visual=’full’]

It was great working with this RAM and being introduced into RAM with RGB. RGB before to be was a gimmick but it really has grown on me, not saying its not a gimmick still, but it’s nice. What makes it nicer is that you can control it. Patriot’s GUI for controlling the RAM is nice and the fact that you can use other pieces of software to control it is nice too, of course to not interfere with other devices. Keeping the RAM in sync though, would have lead to a straight 100%.
The speed on this RAM was also nice, on top of the fact that all the speeds I had tested were all stable and reliable. I could not hit 3600Mhz, but a 300Mhz on XMP is a decent overclock which is even a better overclock when you consider the RAM runs at a stock speed of 2133Mhz. This means overclocking to 3500Mhz from it’s stock 2133Mhz, I actually overclocked it 1367Mhz, not bad at all.
Patriot as always, has done a great job with their RGB RAM and with ranges up to 4133Mhz, you can’t go wrong.
Great job Patriot, congratulations on your Editors Choice.
Back to: Intro
We are influencers and brand affiliates. This post contains affiliate links, most which go to Amazon and are Geo-Affiliate links to nearest Amazon store.
I have spent many years in the PC boutique name space as Product Development Engineer for Alienware and later Dell through Alienware’s acquisition and finally Velocity Micro. During these years I spent my time developing new configurations, products and technologies with companies such as AMD, Asus, Intel, Microsoft, NVIDIA and more. The Arts, Gaming, New & Old technologies drive my interests and passion. Now as my day job, I am an IT Manager but doing reviews on my time and my dime.